Connecting a wifi router tl wr740n. Setting up an L2TP connection with a static IP address. Main settings menu
Since most Internet users today have more than one device at home that needs to be connected to the network, it will not be possible to use them without a router. In this tutorial we will look at correct setting router using the example of the TL-WR740N model from the popular manufacturer of these devices, TP-Link. This model is widespread and is often used to organize access to the Internet from several devices at home or in a small office. Although it has seven hardware versions, the general principles for setting them up are the same. Also, the action algorithms described here are suitable for most models of TP-Link routers.
Connecting the WR740N router to the network
The WR740N router has four yellow LAN sockets on the back side, intended for connecting computers, and a blue WAN port for connecting to the provider. As well as a connector for the plug of the power supply from the mains.
You need to connect an Internet cable to the WAN port. And to one of the LAN ports - your computer or laptop. Of course, if your device is equipped with a Wi-Fi module, you can use wireless connection. However, it is recommended to perform all manipulations to configure the router via a cable - this will ensure connection stability and prevent errors from occurring.
LED indication
LED indicators on the front panel of the WR740N router help you understand what is happening with the device. Knowing their meaning will make it easier to set up and use the device.

Let's look at them in order, from left to right.
Power- the indicator shows that the power is on.
SYS“gear” is a system indicator. If it blinks, everything is in order, and if it is not lit, then a system failure has occurred.
WLAN- Wi-Fi network indicator.
Indicators LAN- there are four of them, according to the number of ports. If it is lit, a device is connected to the port. If it blinks, data is being exchanged.
WAN- Internet connection indicator. It works exactly the same as the LAN indicators. If it lights up orange, the connection is without Internet access or not configured.
Indicator WPS. If it blinks slowly, the device is being connected via WPS. Flashes quickly - connection failed.
Quickly configure your router using the Easy Setup Assistant utility
The router comes with an installation CD with the Easy Setup Assistant program for quick setup. It is universal for all models of TP-Link routers.
If you do not have such a disk or your device does not have a drive for reading CD/DVD discs, the program can be downloaded from the manufacturer’s official website.

The program is Russified, so there should be no difficulties in working with it.
Insert the disc and launch the program. We are not connecting the router to the computer yet - the program will ask you to do this later.
It is important to set the “Obtain an IP address automatically” option in your network connection settings. Otherwise, there may be problems connecting to the router.
In the window that opens, select the model of your router (in this case it is TL-WR740N). In the drop-down list, select “Quick Setup Wizard”. In the window that appears after this, you should select Russian.

Click on the “Start” button. After this, you must follow the instructions that appear on the screen and confirm your actions by clicking the “Next” button.
The program will turn off Wi-Fi on your computer and ask you to connect the router using a cable and turn on the power. If everything was done correctly, network connection will become active. After checking the connection and network status, the program will prompt you to enter Internet connection settings. Your provider should provide these parameters to you.
By default, the program offers WAN settings with a dynamic IP address. You only need to specify your country, region and service provider name. This works for most providers. However, if you have PPPoE or L2TP, in the “WAN connection type” field you must select your connection type and in the next window enter the login and password provided to you by your provider. You may also have to specify a static IP address.
If all parameters have been entered correctly, the router will connect to the Internet. You can check this by launching your browser.
After this, a window will appear asking you to enter Wi-Fi parameters. In principle, you can leave the network name (SSID) as standard, but it is better to change the password. Leave the security level WPA2-PSK in the next window, and enter your password in the box at the very bottom.
Confirm saving the settings and click Finish. Your router is configured and ready to go.
Manually setting up the TP-Link TL-WR740N router
For fine tuning or manually changing settings, you may need to configure your router manually. This can be done through the web interface in your browser. Special programs and no drivers are needed.
How to enter the router settings
To configure your TP-Link router manually, you need to log into its web interface. To do this, you will need the parameters indicated on the label on the bottom of the device - IP address and password.

Launch the browser and enter the router’s IP in the address bar. Usually this is 192.168.0.1, but on some models, depending on the firmware, it may be 192.168.1.1. In any case, this should be indicated on the sticker. In this case, “http://tplinklogin.net”. But if you cannot connect this way, then select the above options, for example, the figure below shows the connection via “http://192.168.0.1”. The default login and password is admin.

If you still cannot connect, you should set your computer to a static IP version 4 address in the same subnet and try again.
The figure shows an example of IPv4 settings. The computer has a static IP address of 192.168.0.5 selected.

Main menu
After entering your password you will be taken to the main menu page. The interface can be blue or green. It depends on the version software, but its general configuration is standard.
The main menu items are on the left. The menu is Russified. However, even if you come across a router with English-language firmware, working with the interface is intuitive.

Wi-Fi setup
To protect your home network from strangers, it is recommended to immediately change your Wi-Fi settings.
To do this, select the “Wireless mode” menu item (Wireless, if you have English firmware) and the “Settings” sub-item wireless mode» (Wireless settings). Here you can change the name of your wireless network. As mentioned above, this is not necessary.
To change the password, select the “Security” sub-item. We don't change anything in the settings. In the “Wireless password” field, enter the password. It must contain at least 8 characters. Click the “Save” button and click on the “Click here to reboot” link. This is necessary for the changes to take effect. After the router reboots, you will need to enter your New Password to connect to a wireless network.
Setting up an Internet connection
You can set up an Internet connection by selecting the WAN sub-item in the “Network” item. There is no point in dwelling in detail on the standard setup with dynamic IP; everything is described in the paragraph dedicated to automatic configuration. However, for some providers you need to enter Extra options, without which the connection will not work.
In principle, you can use the “Quick Setup” menu item and step by step, following the prompts, enter the required parameters. But we will look at manual configuration here for each item separately.
For manual settings Internet connection, you must select your connection type in the WAN connection type selection field instead of dynamic IP. The page will refresh and additional fields will appear below, depending on the type of setting.

Before you begin making settings, turn off the Internet connection on your computer, if you have one.
Setting up PPTP (VPN)
In the “WAN connection type” field, select PPTP/PPTP Russia if your provider provides a static IP address. Enter your username and password in the appropriate fields. Next, enter the network parameters provided by the provider - address, gateway, subnet mask. In the “MTU Size” item, it is recommended to enter a value of 1450 or less. In the “Connection mode” sub-item, you must select auto mode(Connect automatically). We do not change the remaining parameters. Now you can click the “Save” button. The connection is configured.
If your provider uses PPTP with a dynamic IP address, the configuration must be performed as for an L2TP connection.
Setting up L2TP (Beeline)
Select the connection type L2TP/ L2TP Russia. Next, enter the data provided by the provider - login, password and server address. If you are setting up a Beeline Internet connection, the address will look like this: tp.internet.beeline.ru. Save the settings and check if the connection is established.
Setting up PPPOE (Rostelecom, Dom.ru)
This type of connection is configured in the same way. Select PPPoE/Russia PPPoE and enter your username and password in the fields that appear. In the “Auxiliary connection” line, check the “Disable” box. Save the settings.
Setting up IPTV
Internet television has become very popular, since the connection speed today allows you to watch online video in high quality. Therefore, users usually choose routers that support IPTV. This allows you to watch your favorite TV channels from your phone, tablet and any other device. However, not all hardware versions have IPTV support, so before purchasing you should check this issue with the seller or on the manufacturer’s website.
Default IPTV function included. To check this, go to the main menu item “Network”, sub-item IPTV. If there is a line there that says IGMP Proxy, then opposite it you should select the value “Enable”. In the figure below, this line is missing. Also, depending on the firmware version, there may also be an IPTV line here. The “Enable IPTV” option should be checked. The connection mode should be set to “Bridge”, but this item is not available in all firmware.

In principle, this is enough for everything to work.
Additionally, you can specify in the list of LAN ports the one that will be used to connect the set-top box.
Once everything is selected, don't forget to click the "Save" button.
For some providers, for example, Rostelecom, you will need additional settings. For everything to work, you need to register a VLAN ID, the value of which should be provided to you by your provider.
To do this, in the “Connection mode” item you need to select the “802.1Q Tag VLAN” parameter. In the firmware version with a blue interface, you need to select either “Russia” or “Specify manually”. As already mentioned, such a clause may not exist at all. Then you will have to update the router firmware, but we will discuss this issue separately.

In the field that appears, enter the VLAN ID of the provider. In the VLAN TAG line, check the “Disable” box. Save the settings and enjoy watching.
Changing and resetting your password

If you forgot your password or bought a used router and were not told the password. Then you will have to reset the device settings.
There is a WPS/RESET button on the back panel. To return the router to factory settings, you need to press and hold it for more than 10 seconds.. Led indicator SYS on the front panel will flash slowly and then quickly. After this, you need to release the button and wait for the router to reboot.
Keep in mind that all settings will be reset, not just the password. Therefore, the router will have to be configured again.
Firmware for TP-Link TL-WR740N router
The need to update the router firmware may arise if it has become unstable or your firmware is outdated and does not have the functions you need.
It is recommended to download the firmware from the official TP-Link website. You can find alternative firmware on the Internet, but you can use them solely at your own peril and risk - the manufacturer declines all warranty obligations in this case.
To download the firmware, go to the TP-Link website and find your router model there. Be sure to check that the firmware matches your hardware version (it is indicated on the sticker at the bottom of the router), because wrong version may result in malfunction or damage to the device.
Some users are trying to download drivers for their router. However, drivers for the TL-WR740N, like for any other router, do not exist. The router works via network cable without installing special drivers and programs, and the firmware is installed via a web interface.
The firmware should only be installed via cable connection. During the process, the router will disconnect from the wireless network and this may cause a crash. It is recommended to turn off all Wi-Fi connections while updating the firmware.
To flash the firmware, go to the main menu of your router and find the item “ System Tools", sub-item "Firmware update". Then everything is simple - click “Select file” and select the previously unzipped firmware file. Then click the “Update” button. A progress bar will appear on the screen. When it reaches 100%, the router will reboot.

During these manipulations, you cannot turn off the power to the router.
After flashing the microcircuit, your settings will most likely not be saved and you will have to enter them again.
Before we start setting up the router, let's check the connection settings using local network. For this:
Windows 7
Click on " Start", "Control Panel".
Then click on " View network status and tasks".

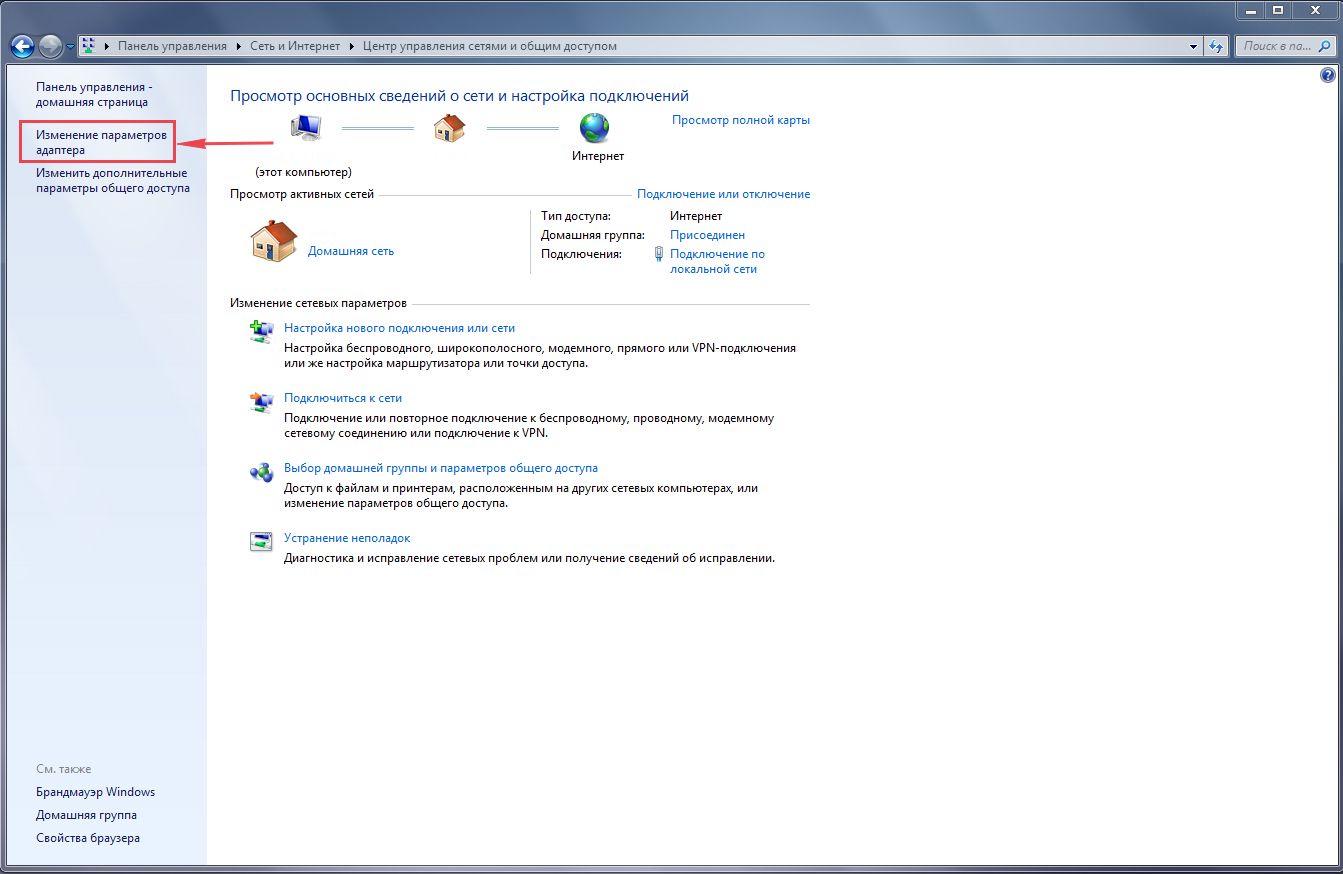
LAN connectionProperty".
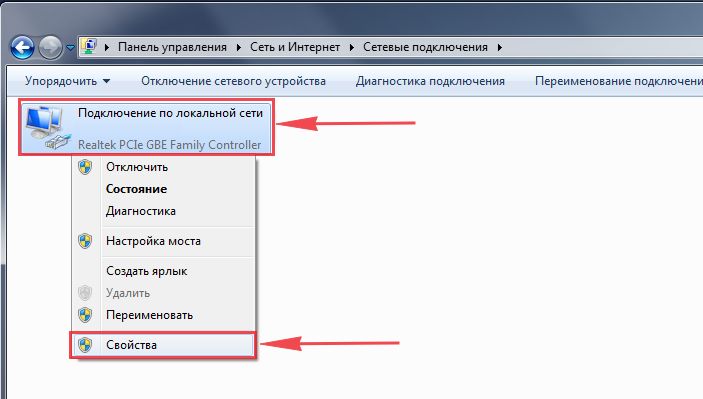
Then select from the list " Internet Protocol Version 4 (TCP/IPv4)" and press " Property".

" and "", then press the " button Ok".

Windows 10
Click on " Start", "Options".

Then click on " Network and Internet".


In the window that opens we see " Ethernet". Click on it right click mouse, select " Property".

Then select from the list " IP version 4 (TCP/IPv4)" and press " Property".

In the window that opens, you need to check the box " Obtain an IP address automatically" And " Obtain DNS server address automatically", then press the button " Ok".

Connecting the TP-Link TL-WR740N router to a computer
The next step is to connect the router TP-Link TL-WR740N to your laptop or Personal computer(PC). To do this, you need to connect the cable that your provider provided to you to the blue port of the router (that is, this is the cable that goes to your apartment, house, office, etc. from outside), and the cable that came with router, one end into one of the four ports, which are marked in yellow on the router, and connect the other end to your laptop or PC. And yes, don't forget to connect the power cable.

Authorization of the TP-Link TL-WR740N router
So, we connected the router, now you need to use any browser (be it Google Chrome, Mozilla Firefox, Internet Explorer, etc.) get into its web interface. To do this, open the browser and enter the router address in the address bar: 192.168.0.1 and press the button " Enter" on your keyboard (in older models this router this address could be: 192.168.1.1 ).
- Username - admin
- Password - admin
So, enter the data and press " Login"


Setting up the Tp-Link TL-WR740N router
And finally we got to the router’s Web interface and now you need to configure the equipment. First of all, let's secure wireless network by setting a password for wi-fi. Then you will need to find out what type of connection is used to access the Internet, is it PPTP, L2TP or PPPOE. You can find out by calling your provider (this is the organization with which you entered into an agreement to provide Internet services). So, let's start setting up the router.
Setting a password for wi-fi
I bring to your attention Video instructions for setting a password for wi-fi on a router Tp-Link TL-WR740N
Let's also take a written and illustrative look at setting up a Wi-Fi password on a router Tp-Link TL-WR740N.
On the Web interface, select the "tab" in the menu Wireless"and we get into" Wireless Settings" - setting up a wireless network. Here it is necessary in the column " Wireless Network Name:"come up with and specify a name for your wireless network, given name In the future it will light up when you connect to the network. Then select " Region" - Russia. After that, click " Save".

Next, go to the menu in the "tab" Wireless Security". Here we will set up a password for the wireless network invented above, for this we select the encryption type " WPA-PSK/WPA2-PSK" and then below in the field " PSK Password:"we come up with and enter a password. Then click " Save".

After we pressed " Save"a message will appear above this button indicating that the settings have been saved and now we need to reboot the router. This is what we do by clicking on the button" click here"by sending the router to reboot. After the reboot, the name of your wireless network will appear in the network settings of your computer.
Setting up PPTP
PPTP on the router Tp-Link TL-WR740N using the Tp-Link TL-WR1043ND router as an example.
Let's also write and illustrate PPTP on the router Tp-Link TL-WR740N.
Network", then " WAN".
IN " WAN Connection Type:"choose" PPTP/Russia PPTPUsername:"), password (in line " Password:Confirm Password:Server IP Address/Name:
Connect Automatically NOT Connect on Demand
Save".

Setting up PPTP with a static IP address
Let's look at the connection setup PPTP with static IP address on the router Tp-Link TL-WR740N.
So go to the menu in the tab " Network", then " WAN".
IN " WAN Connection Type:"choose" PPTP/Russia PPTP", below you will be asked to indicate your username (in the line " Username:"), password (in line " Password:") and password confirmation (in the line " Confirm Password:").
Static IPServer IP Address/Name:"), IP address (in the line " IP Address:"), subnet mask (in line " Subnet Mask:"), default gateway (in line " Gateway:") and DNS (in the line " DNS:"). All of the above data is provided to you by the provider (the organization that provided you with the Internet).
All this data is usually specified in the contract with the provider. If for some reason you could not find them, you need to call hotline Your provider and find out how you can get them.
After you have entered all the necessary data, check the box next to " Connect Automatically" (This setting will keep your Internet connection constantly, so if you NOT unlimited tariff I recommend checking the box next to " Connect on Demand", which means connection on demand, that is, the Internet is connected only when you start using it).
After all manipulations with the settings, press the button " Save".

L2TP setup
Let's look at the connection setup L2TP on the router Tp-Link TL-WR740N.
So go to the menu in the tab " Network", then " WAN".
IN " WAN Connection Type:"choose" L2T/Russia L2T", below you will be asked to indicate your username (in the line " Username:"), password (in line " Password:") and password confirmation (in the line " Confirm Password:"). You will also need to specify the server IP address (in the line " Server IP Address/Name:"). All of the above data is provided to you by the provider (the organization that provided you with the Internet).
All this data is usually specified in the contract with the provider. If for some reason you could not find them, you need to call your provider's hotline and find out how you can get them.
After you have entered all the necessary data, check the box next to " Connect Automatically" (This setting will keep your Internet connection permanently, so if you have NOT For an unlimited tariff, I recommend checking the box next to " Connect on Demand", which means connection on demand, that is, the Internet is connected only when you start using it).
After all manipulations with the settings, press the button " Save".

Setting up L2TP with a static IP address
Let's look at the connection setup L2TP with static IP address on the router Tp-Link TL-WR740N.
Typically a static IP address is provided legal entities, or how additional service to the main tariff individuals.
So go to the menu in the tab " Network", then " WAN".
IN " WAN Connection Type:"choose" L2TP/Russia L2TP", below you will be asked to indicate your username (in the line " Username:"), password (in line " Password:") and password confirmation (in the line " Confirm Password:").
Since the connection uses a static IP address, you check the box next to " Static IP", then indicate the server IP address (in the line " Server IP Address/Name:"), IP address (in the line " IP Address:"), subnet mask (in line " Subnet Mask:"), default gateway (in line " Gateway:") and DNS (in the line " DNS:"). All of the above data is provided to you by the provider (the organization that provided you with the Internet).
All this data is usually specified in the contract with the provider. If for some reason you could not find them, you need to call your provider's hotline and find out how you can get them.
After you have entered all the necessary data, check the box next to " Connect Automatically" (This setting will keep your Internet connection permanently, so if you have NOT For an unlimited tariff, I recommend checking the box next to " Connect on Demand", which means connection on demand, that is, the Internet is connected only when you start using it).
After all manipulations with the settings, press the button " Save".

Setting up PPPOE
I bring to your attention Video instructions for setting up the connection type PPPOE on the router Tp-Link TL-WR740N using the Tp-Link TL-WR1043ND router as an example.
PPPOE on the router Tp-Link TL-WR740N.
So go to the menu in the tab " Network", then " WAN".
IN " WAN Connection Type:"choose" PPPOE/Russia PPPOE", below you will be asked to indicate your username (in the line " Username:"), password (in line " Password:") and password confirmation (in the line " Confirm Password:"). All of the above data is provided to you by the provider (the organization that provided you with the Internet).
All this data is usually specified in the contract with the provider. If for some reason you could not find them, you need to call your provider's hotline and find out how you can get them.
After you have entered all the necessary data, check the box next to " Dynamic IP" And " Connect Automatically" (This setting will keep your Internet connection permanently, so if you have NOT For an unlimited tariff, I recommend checking the box next to " Connect on DemandTime-based Connecting
After all manipulations with the settings, press the button " Save".

Setting up PPPOE with a static IP address
Let's look at the connection setup PPPOE with static IP address on the router Tp-Link TL-WR740N.
Typically, a static IP address is provided to legal entities, or as an additional service to the basic tariff to individuals.
So go to the menu in the tab " Network", then " WAN".
IN " WAN Connection Type:"choose" PPPOE/Russia PPPOE", below you will be asked to indicate your username (in the line " Username:"), password (in line " Password:") and password confirmation (in the line " Confirm Password:"). Since the connection uses a static IP address, you check the box next to " Static IP", then indicate the IP address (in the line " IP Address:"), subnet mask (in line " Subnet Mask:").
All of the above data is provided to you by the provider (the organization that provided you with the Internet).
All this data is usually specified in the contract with the provider. If for some reason you could not find them, you need to call your provider's hotline and find out how you can get them.
After you have entered all the necessary data, check the box next to " Connect Automatically" (This setting will keep your Internet connection permanently, so if you have NOT For an unlimited tariff, I recommend checking the box next to " Connect on Demand", which means connection on demand, that is, the Internet is connected only when you start using it, or " Time-based Connecting", which means a timed connection, that is, the Internet works at a certain time specified by you).
After all manipulations with the settings, press the button " Save".

Changing the web interface password
I bring to your attention Video instructions for changing the password on the router web interface Tp-Link TL-WR740N using the Tp-Link TL-WR1043ND router as an example.
Resetting the web interface password
If you set a password for the web interface of the router and forgot it, I invite you to watch the Video instructions for resetting the web interface password on the router Tp-Link TL-WR740N using the Tp-Link TL-WR1043ND router as an example.
Firmware update
I bring to your attention Video instructions for updating the firmware on the router Tp-Link TL-WR740N using the Tp-Link TL-WR1043ND router as an example.
Connecting a computer to wi-fi
After connecting and setting up the router, you need to connect the computer to a wireless network (wi-fi), consider connecting to wi-fi in two operating systems, these are Windows 7 and Windows 10:
Windows 7
Video instruction

Sultan

Connect automatically" and press
"Connection".


Windows 10
Video instruction
In the lower right corner of the desktop, find the wireless network (wi-fi) icon and click on it with the left mouse button.

A window pops up with a list of available wireless networks. Select a wireless network, in my case it is the network " Sultanova"(You select the network whose name was given at ).

After selecting the network, check the box next to " Connect automatically" and press " Connect".


We wait perhaps a couple of seconds and you are connected to your wireless network.

Wireless technologies have long been part of our lives and almost every Internet user has a Wi-Fi router; all providers offer its installation and configuration upon connection. At the same time, situations regularly occur when you need to change the settings of the router, and your own knowledge is not enough, and there is no desire or opportunity to contact technical support. This article details the basic settings of the popular model. Wi-Fi router TP-Link WR-740N.
The first thing you need to do is get to the main menu; to do this, open an Internet browser and type 192.168.0.1 in the address bar, after which the device will ask for a login and password. They are printed on a sticker on the bottom side of the case and coincide with each other - this is the word admin.  After entering the password, we are taken to the main settings screen.
  Further, the setup will be different for different providers, so we will look at 3 examples for the most popular federal operators - Beeline, Rostelecom and Dom.ru.
Setting up the WR-740N router for Beeline
While on the main screen, click on the “Network” section in the menu on the left, then “WAN”. Beeline uses a secure VPN connection to establish a connection to the Internet, so the settings will be as follows:
- WAN connection type - L2TP or Russia L2TP,
- Server name (IP address) - tp.internet.beeline.ru
 Click the “Save” button at the bottom of the screen, wait a minute or two and click the “Connect” button located below the password entry fields. It is important that the Beeline connection, which is in the list of Windows network connections, is not established.
Setting up the WR-740N router for Rostelecom and Dom.ru
These providers provide their users with Internet access through a point-to-point connection, descending from connections through telephone network. Again, go to the “Network” section, then “WAN”, but the settings will be different:
- Connection type - PPPoE or Russia PPPoE,
- Username and password - your login and password provided by the provider,
- Secondary connection - Disable,
- Connection mode - Connect automatically.
 After the setup is completed, click the “Save” button, after a short pause, refresh the page to make sure that the connection status is now “Connected”. At the same time, the Windows network connection, in this case called “High-Speed Connection,” should also not be activated.
Setting up Wi-Fi on TL WR740N
Since the router is wireless, this function is almost always used. On the main screen, select the “Wireless Mode” menu section, then “Wireless Mode Settings”. The network name (SSID) can be left as default, but it’s better to come up with your own name to make it easier to find it among neighboring Wi-Fi networks. We leave the remaining settings as default.  The next step is very important - setting a password for Wi-Fi connections. In the “Wireless Mode” section, find the “Wireless Protection” item, where we select the WPA2-Personal option and enter the Latin alphabet in the “PSK Password” field strong password, consisting of at least 8 characters. As you know, it is not recommended to set your password to your name, initials, date of birth and consecutive sets of characters such as qwerty.
The best option would be a combination of letters in different cases, numbers and symbols like “_” or “=”. Having set a password, do not forget to apply the settings by clicking the “Save” button. 
Setting up IPTV on TL WR740N
Along with the Internet, providers also provide transmission digital television Fortunately, the WR-740N also supports this functionality. Go to the “Network” – “IPTV” section, in the “Mode” list, select “Bridge” and indicate the port to which the TV or set-top box is connected with a cable. There are 4 of them in total and they are numbered, so it won’t be difficult to figure it out.  Next, we save the settings as usual and calmly enjoy all the benefits of modern communications. This concludes our article about TP-Link WR-740N, purchase this device without fear!
Hello, this is the second article and series of articles “ detailed instructions by setting up tp link tl wr740n". If you haven't read the first part and , do it. This router model is capable of connecting to all modern standard types of Internet connections, the most popular of which are:
- PPPoE – used by popular providers Rostelecom, Dom.ru, Megaline, ID-Net.
- PPTP with VPN servers - used by providers Aist Togliatti, Ufanet (UfaNet).
- L2TP team connection – modern connection type, Beeline and Kyivstar have already switched to it.
- Static IP (Static IP) is one of simple types connections. There is an opinion that it has fewer glitches and faster data transfer. The provider Triolan works with him.
- Dynamic IP is a forgotten connection type. I didn't find providers working on it, this type well suited for connecting two routers via cable.
Login to the router configuration interface 192.168.0.1
After connecting the router to the device, let's go to it. To do this, open any browser (Opera, Mazila, Google Chrome, Yandex Browser). In the address bar we type 192.168.0.1 and press “Enter”, the authorization window will appear, here we enter the Username – admin, Password – admin.
Then click on the “Submit” button and we get to the router settings:
Setting up an Internet connection
Now let's move on to the most important part of setting up the tp link tl wr740n router. In this Internet connection setup, you need to be very careful not to miss anything. Otherwise, your Internet will not work. To start setting up, go to the “Network” item and select the WAN section.
Here we will be interested in the “WAN connection type” drop-down menu, select the type you need and make the settings described below.
Setting up an Internet connection PPPoE Rostelecom, Dom.ru, Megaline, ID-Net
PPPoE is one of the most popular connection types. This type is used by regional providers such as Rostelecom, Dom.ru. But these are not the only providers that use this type. Write in the comments which providers you would like to hear about and I will definitely write about them. Okay, let's start filling out the form:
- Select the connection type PPPoE/Russia PPPoE.
- In the fields that appear " Username:», « Password:», « Confirm the password:“You need to enter your data, they must be specified in the contract. If you don’t have them, contact your provider’s technical support. Also, if you are provided with a PPPoE service with a static IP address, in the “ Secondary connection:"Place a dot next to the inscription " Static IP" You can also find out exactly what service is provided to you from those. support.
- After filling in all the data, put a dot opposite the inscription “ Connect automatically:", leave the remaining fields unchanged.
- Click on the button " Save».
Configuring the PPTP connection type Aist Tolyatti, UfaNet (UfaNet)
Also, one of the popular connection types is used by many providers. I highlighted two: Stork Tolyatti, Ufanet (UfaNet). If you want to know about your provider, write in the comments. The main difference from PPPoE is using a VPN server. I would like to immediately indicate the address of the VPN server and the providers I indicated:
- Stork Tolyatti- server.avtograd.ru
- Ufanet (UfaNet)– pptp.ufanet.ru
If you have a different provider, write in the comments and I will try to find your server. You can also contact technical support. So, setting up tp link tl wr740n router type PPTP with VPN servers:
- Typeconnections— PPTP / Russia PPTP
- Username
- Password– also indicated in the contract, if not, check with technical support
- Select the type of IP address of the service provided. Dynamic IP or Static IP
- IP address/server name— enter the VPN server of your provider (for two I indicated above).
- We put a point against Connect Automatically
- Click the button " Save».
L2TP connection type. Beeline (beeline), Kyivstar
A new type of connection compared to others. The description of L2TP says that this type is an improved version of PPTP and PPPoE. This type in this moment used by companies such as Beeline, Kyivstar, etc. If you have another provider with this type of connection, write in the comments. When setting up L2TP, as in PPTP, you need to specify a VPN server. Let's see what it is like for the providers I indicated:
- Beeline(beeline)— tp.internet.beeline.ru
- Kyivstar- tp.kyivstar.ua
If you have a different provider, write in the comments, we’ll try to figure it out. Let's now answer the question of how to set up a tp link tl wr741nd router for Beeline, Kyivstar and other companies.
- Typeconnections— L2TP / Russia L2TP
- Username– your login in the contract or contact technical support
- Password– also indicated in the contract, if not, check with technical support
- Select the type of IP address of the service provided, Dynamic IP or Static IP. Find out from your provider if the option is static, put a dot and enter the settings provided by the provider, if dynamic, you don’t need to enter anything.
- IP address/server name— enter the VPN server of your provider (I indicated above for two).
- Place a dot next to Connect Automatically
- Click the button " Save».
Yes, that's right, the process is completely identical to setting up PPTP, with the exception of the connection type.
Setting up Static IP
Static IP in its pure form is gaining popularity. There is an opinion that providers spend less resources to use it and this increases quality. But my opinion is that with the development of technology, this type of connection is less secure than, say, PPtP or L2TP. But it is used by many companies, such as Triolan (if you have a different provider, write in the comments). Also, static IP is now quite in demand; many sites take into account the IP address when registering, and if you do not have a dedicated one, you will not be able to register. So you can order the Static IP service from almost every provider and they will add it to the connection types PPtP, L2TP, PPPoE (I wrote about this above). Let's start setting up a Static IP on the tp link tl wr740n router.
- In the connection type we select Static IP.
- Cells will appear ip address, Subnet mask, Main gate, And DNS servers . These settings can be obtained from your provider, or, if you were connected to the Internet, you can find them from your computer. Described in detail here.
- After entering the settings, press the button “ Save».
Setting up Dynamic IP
The easiest way to connect to the Internet does not require a login or password, unfortunately (or fortunately). The providers I know of have refused to use this type of connection because it is the most insecure. But if your friend has this type of connection, then the setup is simple: select Dynamic IP, check that in the fields IP Address:, Subnet Mask:, Default Gateway: were received. Also, if your provider uses a special DNS, be sure to register it. I advise everyone to register “Secondary DNS:” - 8.8.8.8 dns of Google companies ( Google ). The rest of the settings are unchanged. And click “Save”.
MAC address cloning.
Many providers tie the Internet connection to the MAC address of one computer as a method of protection. In order for the Internet to work through the router, you need to set the MAC to the router. To do this you need to go to the section " Net" and select the item " CloneMAC address" If you are setting up a router on a computer that has been connected to the Internet, you need to click the " CloneMAC address", and then " Save" If not, you need to register the Mac that is with the provider and enter it in the “ WAN MAC address:" and press the button " Save».
Spreading huge amount devices capable of connecting to the Internet using wireless technologies, has led to the fact that the presence of Wi-Fi coverage in a house or apartment has ceased to be something special, but rather has become a necessity. Almost every family has laptops, smartphones and tablets, and all users of these devices need Wi-Fi. Today, creating a wireless network in a small room is very simple; you only need a router. Below we will talk about a budget, but not only because of this, very popular model - TP-Link TL-WR740N. Setting up the router will also be covered.
Possibilities
Before moving on to the issues of installing and configuring the router, you should dwell on a description of its main capabilities. This will allow a potential buyer to avoid making a mistake in choosing a device. The characteristics of the TP-Link TL-WR740N, coupled with its low cost, allow this device to claim the title of one of best solutions for use in an apartment or small house. The device supports modern standards for transmitting information in Wi-Fi networks, including 802.11n 2.4 GHz with speeds up to 150 Mbps, as well as commonly used encryption protocols. Connecting to the Internet can be done using permanent and dynamic IP addresses, as well as through PPPoE, PPTP and L2TP.
Additional functions
To additional useful functions IPTV support should be included, as well as the ability to broadcast ports. Among other things, the router supports DMZ and UPnP. Setting up the TP-Link TL-WR740N is quite simple, and even a novice user can figure this issue out. Summarizing the above, it is worth noting that this model can be recommended for creating a network of 1-3 computers and several mobile devices, that is, for the normal needs of the average user.

Connection
The first thing that is required after purchasing any router is connecting a cable from the provider to the device, as well as pairing the device with a PC using the patch cord that comes with the router. It is advisable to connect the TP-Link TL-WR740N for setup via a cable, and not Wi-Fi, do not forget about this. There are five connectors on the rear panel of the device, one of which is marked in blue (WAN). It is into this blue connector that the cable from the provider is connected. To connect to a PC or laptop, use any of the yellow connectors (No. 1-4). After the network wires are connected and the router receives power from a 220 V outlet, you need to press the power button located near the connectors and you can proceed to configuration. By the way, the TP-Link TL-WR740N diagram, according to which the router connects to other devices, is displayed on the box.

Establishing an Internet connection
The main function of each router is to distribute the Internet to other devices. Before you implement this opportunity, you need to configure TP-Link TL-WR740N to receive Internet from your provider. To do this, you need to use the capabilities of the router's web interface. The settings are accessed at tplinklogin.net or 192.168.0.1, which is entered in the address bar of any Internet browser. After authorization (by default, the login and password correspond to the value admin), a screen will open in which absolutely all parameters of the router are set. The most in a simple way To quickly connect the Internet to the router is to use the “Quick setup” item. Going to this item will launch a special wizard, following whose instructions you need to determine the network parameters. For most users TP-Link setup TL-WR740N in this version comes down to selecting the country, city and provider in the first step of the wizard.

Wireless Settings
In addition to connecting to the Internet, the setup wizard described above allows you to configure the parameters of the wireless network, represented mainly by the name of the latter, the password for access, and the type of encryption. You can set your own parameters, or you can leave the default values. By the way, the default wireless network password is written on a sticker located on the bottom of the device. Once you have completed entering the required data, you must click the “Next” button on the settings screen, and in the next window, click the “Finish” button. After rebooting, the device should connect to the Internet and begin distributing traffic via the wireless network. If this does not happen, you will have to double-check that the settings have been made correctly by running “ Quick setup" again.
Firmware update
Large manufacturers network equipment, and TP-Link is no exception, they are constantly working to improve the software that underlies the operation of their devices. To update the firmware, you must use the “Firmware Update” item in the “System Tools” menu of the router web interface. Reflash TP-Link TL-WR740N if available new version Firmware on the manufacturer's official website is highly desirable. In most cases, this procedure increases the stability of the router and can also introduce new functions to the device.

Firmware procedure
So, to update the firmware, you need to use the “Firmware Update” tool described above. But before moving on to the procedure, you need to download the firmware file from the manufacturer’s official website. When downloading a file, it is important to take into account the hardware version of the router. Revision information can be found on the device box, as well as on the label located at the bottom of the router case. After required file downloaded to the PC disk, you need to go to the update tool screen, click the “Select file” button, specify the path to the firmware in the Explorer window, and then click the “Update” button. The process of rewriting the firmware will begin, and then the automatic reboot router.

Conclusion
As you can see, the TL-WR740N is a router model that can be recommended to every user with low demands as a basis for creating home network. At a low cost, this solution seems almost ideal, at least for those who are taking their first steps in the world computer networks or owns a small number of devices that require an Internet connection via Wi-Fi.