Download the memory card application. How to install applications on an Android memory card. How to transfer installed applications to an SD card using built-in tools
Almost all phones and tablets released in 2018 have a large amount of built-in memory, which is expandable using a microSD card of 32 GB or more (in mid-range and flagship models). But among owners of older and inexpensive devices with internal storage of 4 GB or less, the issue of shortage free space It’s especially acute on a smartphone. In this article, we will look in detail at all the ways to transfer applications to an SD memory card in Android.
The instructions are intended for both beginners and experienced users, so it talks about transferring applications not only regular means, but also with the help of special programs that require root rights.
You can also free up space in the internal memory by deleting system applications.
How to transfer applications to a memory card using accessible means
Starting from the very earlier versions Android, the system had a function to transfer most installed applications to an SD card. Instead, in Android 6.0 Marshmallow, it became possible to use a memory card as an internal drive (this method is also described in the article).
Let's look at the function as an example Samsung phone under Android control 5.0:
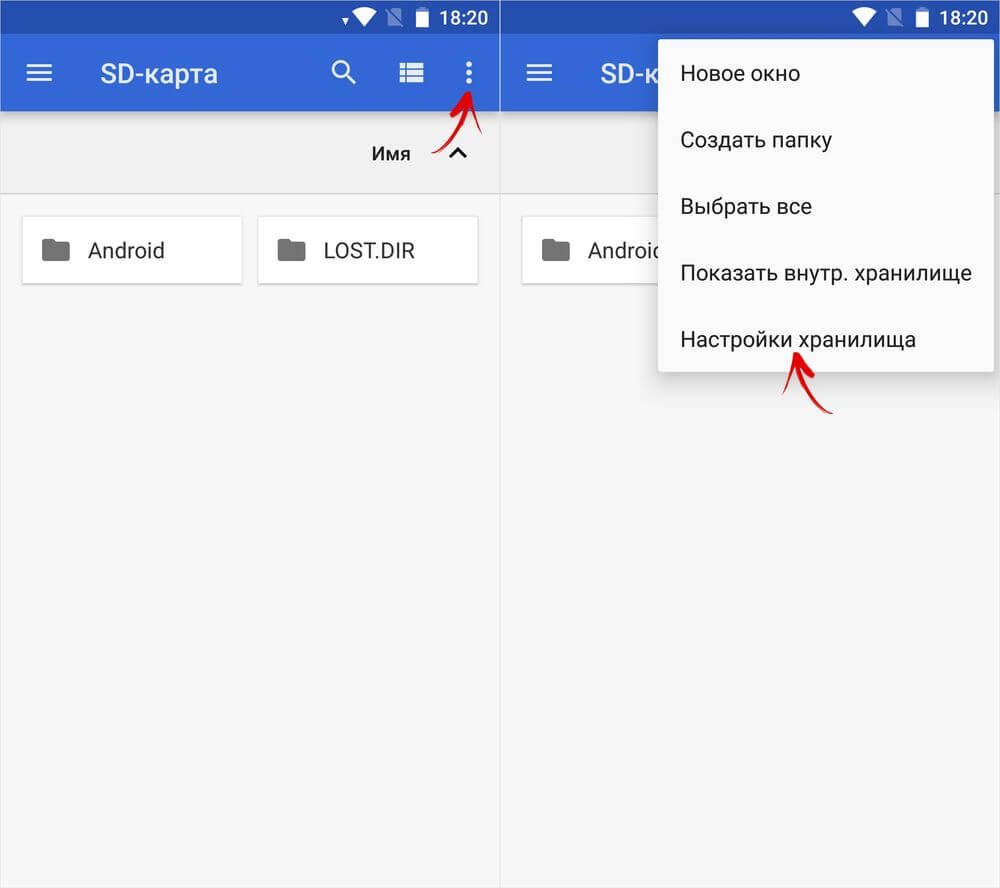
Go to Settings and select Apps. Depending on the manufacturer and firmware, the item may be called “Application Manager”, “All Applications”.

Select the downloaded game or program. If the application can be moved, the “Move to SD card” button will be active. Click on it.

If the button does not work, the developer has prohibited installation of the application on the memory card and you will not be able to move it using standard means.
AppMgr III (App 2 SD) for transferring applications
In order not to open the settings of each game or program and not see whether they can be transferred or not, use the AppMgr III (App 2 SD) utility - in it, the moved applications are collected in a separate tab.

Hold your finger on app cards to mark them. Select the ones you need and click on the folder icon at the top. In the new window, click on the red arrow, which will take you to the application details page. To go to the settings of the next selected program or game, press the Back button.

AppMgr III will also tell you which applications should not be installed during external memory so that all their functions work correctly.
Using an SD card as internal memory
This feature was introduced in Android 6.0 and works in Android 7 Nougat, Android 8 Oreo and Android 9 Pie. It allows you to use a memory card as a built-in storage device. Since SD replaces internal storage, it makes sense for the flash card to be larger than the internal memory. And for applications to work quickly, the SD card must have high speed records.
Data from a memory card formatted as an internal drive will not be read if you install the SD card in another smartphone or tablet. To use the card in a new device, you will have to format it as portable storage.
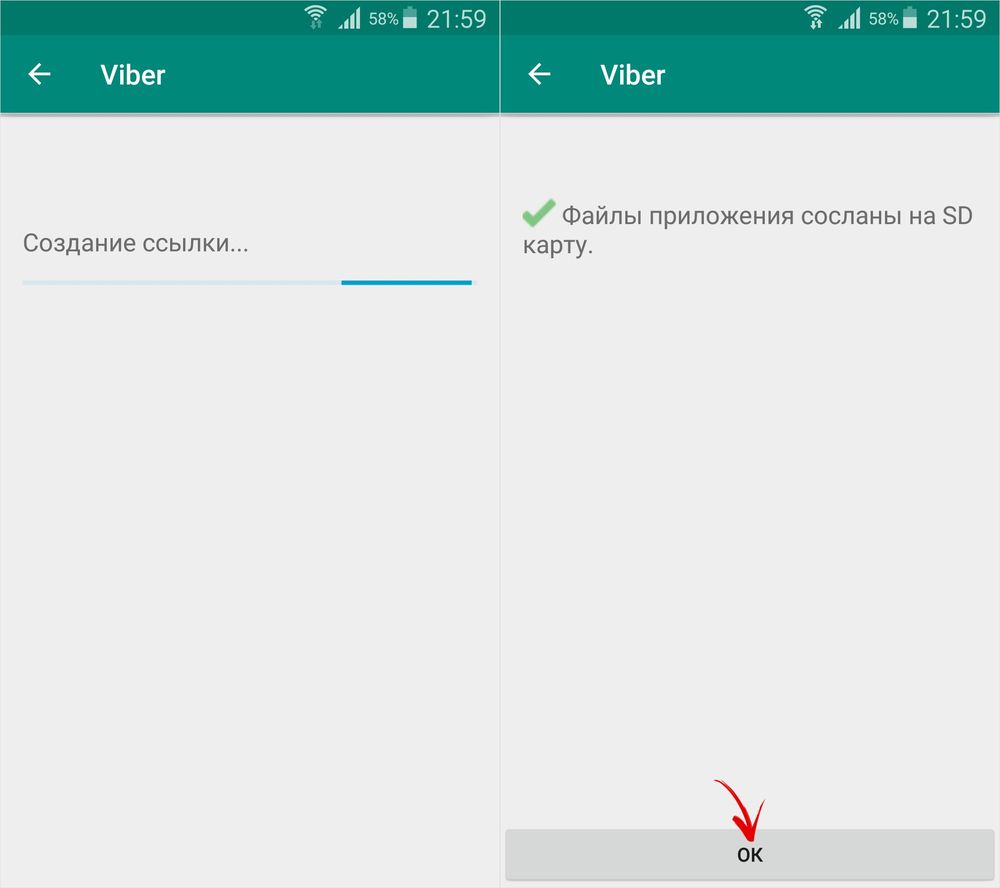
After connecting, a message will appear in the notification shade that it has been detected. new map memory. Just click “Configure”, select “Internal memory” in the window that opens and follow further instructions. Don't forget to transfer files from the SD card to another storage device, as they will be deleted during the formatting process.

Detailed instructions for setting up the card:
1. Go to “Settings” → “Storage” (may be called “Storage and USB drives” or “Memory”).

2. Click on "SD Card".

3. In the upper right corner, open the menu, select “Settings” (in some firmware “Memory”).
4. Click Internal Storage.

5. A warning will appear on the screen that all data saved on the SD card will be deleted during the formatting process. Therefore, copy them first, and then click “Clean and Format”.

6. If your smartphone uses low-class SD (for example, microSD Class 6), a message will appear on the screen that the memory card is slow.

7. Before completing the formatting process, you will be prompted to transfer some files and applications to the SD card. Select the option you want, click Next and then Transfer.

8. Finally, click “Done” and manually restart your phone.

Now open “Settings” → “Applications” → “Application details” (if this item is not there, go to next action) and select installed program or a game.
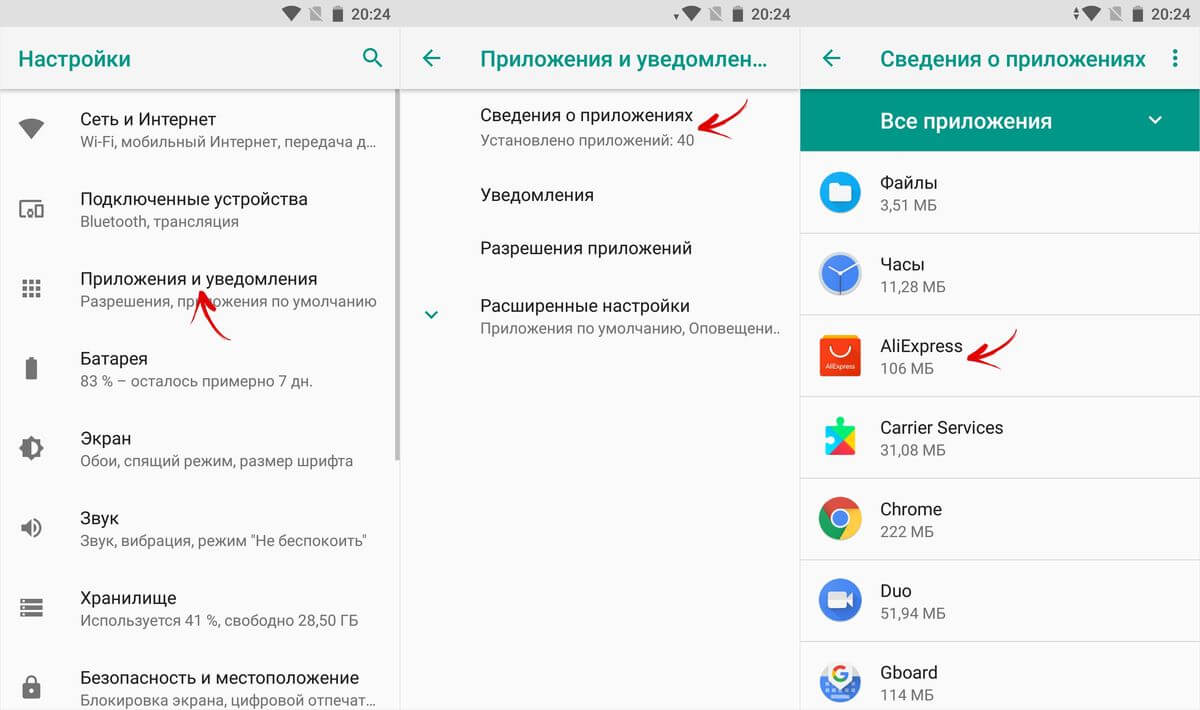
Click “Storage” (may be called “Memory”), then click the “Change” button and select the SD card.

In the window that appears, click “Move” and wait for the transfer to complete.

Formatting a memory card as an internal drive using ADB
If your smartphone has Android 6, 7, 8 or 9 installed, and there is no option to format the SD card as internal storage in the settings menu, the manufacturer has not added such an option to the firmware. But users can format the memory card themselves using the utility.
To do this, activate on Android, connect your mobile device to your PC and launch ADB from command line or from Windows PowerShell if you have one of the latest builds of Windows 10 installed on your computer. Type the following command and press Enter (in Windows PowerShell, add ./ before the command).
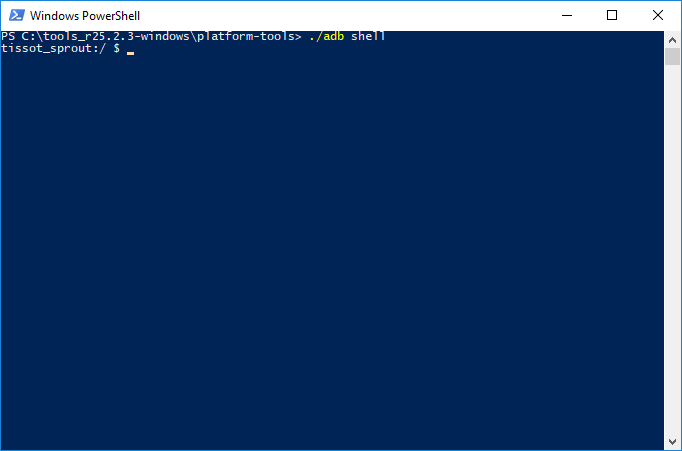
The console will launch and the “$” sign will appear in it. Type the command and click Enter:

The line below will display the view's SD card ID disk:NNN,NN. Replace NNN,NN to the value of the received identifier and run the command:

Wait for the command to complete. Then go to Settings → Storage and select SD card. Expand the list of options by clicking on the three dots at the top and click “Transfer Data.”

Select "Transfer" and wait for the process to complete. Finally, click “Done.”

How to move multiple apps to SD card in Android 8 Oreo and 9 Pie
To avoid performing the same steps to transfer applications separately, use the AppMgr III (App 2 SD) program, which was described at the beginning of the article. Only on Android 8 Oreo and Android 9 Pie you will have to give AppMgr III a couple of permissions.
Launch the application. A notification will appear that the program needs access to your usage history. Click Allow, select AppMgr III from the list of applications, activate the switch and return to the program. You can also configure access to your usage history by going to “Settings” → “Applications and notifications” → “Advanced settings” → “Special access” → “Access to usage history”.

Select the games and programs that you want to move to the flash card and click on the image of the folder with the arrow inside. In the "Move to Map" window, click on the red button below.

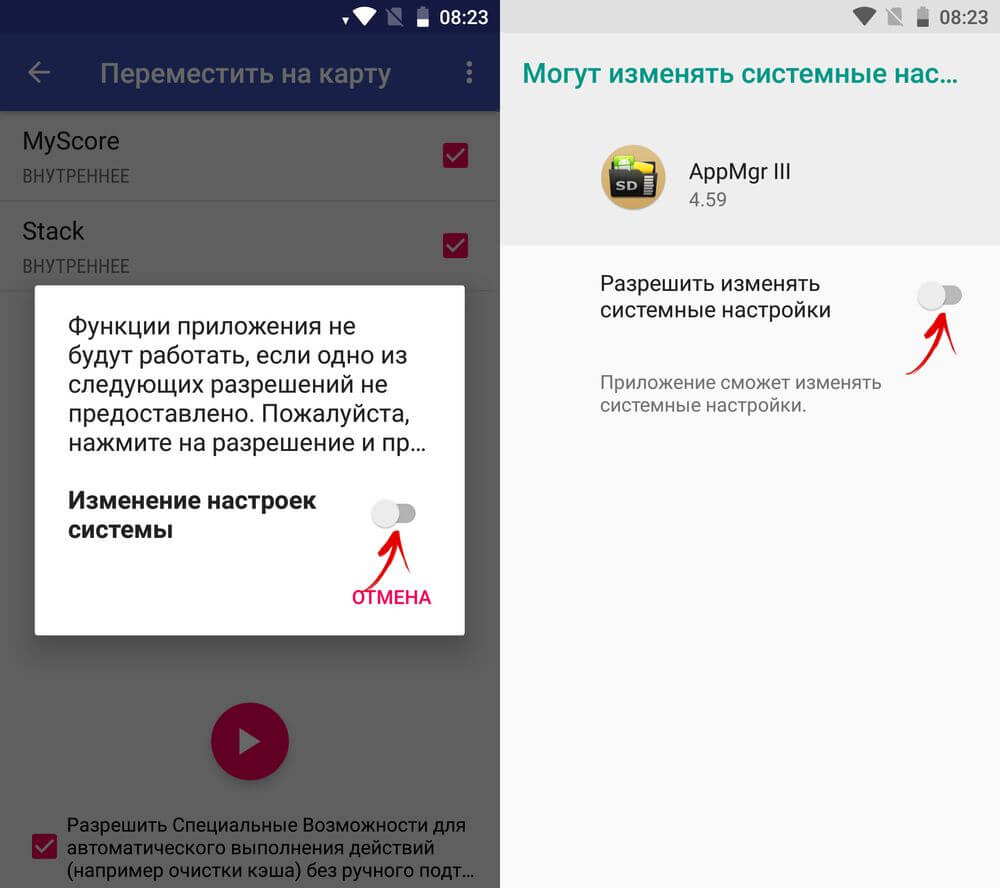
A message will pop up saying that AppMgr III needs permission to edit. system settings. Click on the switch and you will be taken to settings. Activate the toggle switch and return to the application. The options for this permission are located under Settings → Apps & notifications → Advanced settings → Special access → Change system settings.
You will then be prompted to allow AppMgr III to automatically perform actions without manual confirmation for each application. Click "YES", go to the "Accessibility" section, select "AppMgr III", switch the toggle switch to the "ON" position and confirm by clicking "OK". Then return to the program.


Application transfer will begin immediately. Just wait for it to complete.

At the end it will show that the applications have been moved to the memory card.
Transfer games to SD card in Android
Most of the user memory is occupied by the cache installed games. To move it, we will use the FolderMount program, which can mount directories from internal memory to external memory. It requires .
Download FolderMount from Google Play, run and provide Superuser rights.

In the “List of Pairs” tab at the top, click on “+”.

Come up with and enter the name of the folder pair in the first line.

Click on the second one, which will open the built-in file manager. The game cache is located in the “Android/obb” directory, and the application cache in “Android/data”. Go to the folder you want to mount and click on the checkmark.

The screen will ask if you want to create the destination folder automatically. Click "YES" if you agree. In this case, FolderMount will copy the path from the internal storage and create the same on the external drive. Click "NO" if you want to manually set the mount end point and select the folder where to move the files.

To start copying, click on the checkmark and confirm the transfer by selecting “YES” in the next window.

The process will be displayed in the notification panel.

Once copying is complete, switch the toggle switch in the “List of Pairs” tab to mount.

At the bottom there is a button with a pin image, clicking on which will mount all directories at once.

To move files back from the destination folder to the source folder, first unmount the pairs: to do this, turn off the toggle switch or click on the crossed out pin, then hold your finger on the pair and click on the trash can icon.
How to move apps using Link2SD
Link2SD is a program that can mount application data onto a memory card. In order for it to work, it is necessary to create an additional partition on the SD in the ext3/ext4 file system on the mobile device. Partitioning a memory card into sections is done in one of the following ways.
(!) Before you create new section, copy all the files located on the SD, as they will be deleted after partitioning the memory card.
Memory card partitioning on Android via TWRP
If installed on your smartphone, partition the SD card through it. To do this, click “Advanced”.

Select "Partition SD card".

Check "Micro SD card" and click "OK".

Select the file system of the ext-partition to be created and specify its size. For example, 2048 MB - this memory will become available for transferring applications and the volume of the SD card will be reduced by that amount. Leave the Swap partition size (paging file) equal to 0.
Drag the slider to begin SD marking.

At the end, click “Reboot System” and “Do Not Install” if you do not want to download official application TWRP.


The device will reboot. If you go to “Settings” → “Memory” (or “Storage” in latest versions Android), you will see that the SD size has decreased. The second section “sees” only Link2SD, App 2 SD and similar applications.
Create a hidden partition on SD using AParted
The second way to split a memory card into 2 partitions if you have Superuser rights, but no TWRP:
Go to “Settings” → “Memory”, click “Disable memory card” and confirm the action.

Launch AParted and grant root access.

There are 2 bars in the Create tab: the top one will display the new partition, and the bottom one shows the current SD size and its file system.

Click "ADD" to create the first partition. It will be new size Memory cards where you can save photos, music, videos and other files. Leave the checkbox next to “Format”, the fat32 file system and select the size with the slider. To set it more precisely, click on the number next to MB, enter the desired value and click OK.


Click “ADD” again and create a second hidden partition to which games and applications will be transferred. Pull the slider all the way, leave “Format” checked and select the ext file system.

Click “APPLY” and select “OK” in the warning window that appears.

The SD partitioning process will start.

When completed, the second line will display 2 sections.

Now connect the memory card through “Settings” if this did not happen automatically. The new SD size should be displayed there.
Working with Link2SD
Open Link2SD and grant the program Superuser rights.

A window with a choice will immediately appear file system hidden section SD cards. Check the appropriate ext version and click OK. If the window does not appear, expand the menu on the left and click “Recreate mount script.”


Then click "Restart device" to mount the second partition of the memory card. The device will reboot.

Once Android is launched, go to Link2SD, click on the 3 dots in the top right corner and select "Multiple".

Check required applications and reopen the menu. Click "Send".


There is also a "Move to SD card" feature that moves apps standard method Android, not available to users without Link2SD.

If you need to move one game or program, find it in the list, click on it and select “Send” or “Move to SD card”.

Unfortunately, the lack of space on the internal storage of Android devices has been felt quite strongly lately, because with the development of the capabilities of the operating system itself, many programs and games have become much more demanding of free resources and the amount of memory of gadgets. That's why many people use removable SD cards. But they don’t always want to install Android applications on a memory card.
General Installation Information
In any version of the Android OS, installation of applications on the memory card is disabled by default. In principle, if the device itself and the OS version support this feature, as they say, there is no need to reinvent the wheel. After digging a little into the settings, you can set your own parameters.
This is a relatively short and simple process, which will be discussed a little later. You can install applications on the memory card in other ways. Let's focus on these situations for now.
Downloading applications to a memory card
Before solving the installation problem, let's consider downloading content to a removable device. The fact is that in Android, installing applications on a memory card in most cases should be in close connection with the process of downloading installation distributions, since they can also have quite large volumes.

Almost all Android devices support downloading content to an SD card, regardless of the OS version or installed firmware. To set the location for saving files on the memory card, just log in, for example, to an Internet browser and in the advanced settings specify removable media as the storage location. The same can be done in the case of creating photos, when you need to use the settings of the application itself to configure it.

You can do it even easier by downloading applications using a laptop, and then copying them to an SD card. In principle, the download location can also be changed in any file manager.
Methods for installing and relocating applications to SD cards
Now about the most important thing. Using installed or already installed applications from a memory card is not so difficult. First of all, you need to see whether the device itself supports such capabilities. It also happens that the transfer, and even more so the installation, of applications to removable media is simply blocked by the gadget manufacturer. What to do in this case?
For the Android OS, installing applications on a memory card can be done in several ways. For example, you can first install a program or game using the standard method on the internal drive, and then transfer it to another location (in this case, to an SD card).
For direct installation on the card, you can use third-party utilities. It is clear that creating applications for Android in most cases implies the ability to install or transfer them to another location.
Using system settings
If there is a need to install an Android application on removable media, you first need to take into account several aspects. First of all, you need to go to the settings, where you select the “Applications” item, and then go to the application settings themselves. There is a special line “Move to SD card”. If the device or installed on internal memory the application supports this function, the transfer will be completed within a couple of minutes, after which an active “Move to phone” button will appear for each transferred program or game.

As is already clear, in Android OS the application will be launched from the memory card after the transfer process is completed.

But don't rush to rejoice. Sometimes both the mobile devices themselves and the creation of applications for Android use it simply does not provide such functions. In addition, you may even need root rights or use of “super user” mode.
Best programs
Today there are a lot of programs for transferring either direct games or games to removable media. As a rule, almost all programs of this type are classified as freeware. True, here it is worth paying attention to the fact that some utilities are very easy to use, and with some professional programs You'll have to tinker with it to figure out what's what.
Among the simplest means of transferring programs to removable media are popular packages like AppMgr Pro.

This application automatically analyzes the data of installed applications, and then provides the result in the form of a sorted list, which separately identifies Android applications that can be easily transferred to the memory card. After selecting the required applications and confirming the actions, the transfer will be carried out automatically without any damage to the system.

No less interesting is the Link2SD utility. But the average user will have to deal with it for quite a long time, because he will need to split the card into sections from the computer, for example, using software package MiniTool Partition Wizard Home Edition, one of which must have (Primary), and the second - ext2 (depending on the device and the OS version, this can be ext3/ext4). It is in the second section that portable or installed programs will be stored.
The most extreme case is the use of a mobile device connected to a computer or laptop via a USB interface. To install applications on a memory card, you will first need to install the program on both your smartphone and your computer. After connecting and synchronizing, you can install applications directly from the control program window from a computer terminal.

There are software products of this type a large number of. We should also highlight, say, Mobogenie or My Phone Explorer, and the second utility supports not only Android devices. Working with such programs is quite simple. You just need to select and indicate the installation location of the program (again, if such support is available for both the device and the program).
Forced installation of programs on a memory card
In some cases, you can try to use another non-standard method. In Android operating systems, installing applications onto a memory card using this method is called forced installation.
The essence of the process itself is to install the ADB RUN program on the PC. On a smartphone, when connecting via a USB port, it must be enabled.

After launching the application on your computer, you will need to enter the following commands:
Su - if present (if not, the command is skipped).
pm getInstallLocation(“0” by default).
pm getInstallLocation 1- installation into the device’s own memory.
pm getInstallLocation 2- installation on a memory card.
pm getInstallLocation 0- return to default settings.
In principle, there are few commands, but you can see for yourself that this is not the most convenient way. Although in some cases it can be used quite effectively when other methods do not help.
Application performance issues
It is believed that in the Android OS, installing programs on a memory card is not all. After installing or migrating an application, you need to run and test it. If the launch does not occur, or the program does not work as it should, you will have to repeat the above steps from the beginning. You can try moving the application to the initial location and check its performance there. If everything is fine, then the problem is either in the program, or in the memory card, or in incorrectly performed transfer or installation operations.
Conclusion
To summarize, we can say that the simplest and most common methods of transferring and installing applications to removable memory devices have been discussed here. Naturally, each utility has its own characteristics, as well as portable or installed programs. Even different modifications of mobile gadgets, not to mention Android OS versions or firmware, can play a very significant role. But in most cases, at least one method will be effective for many.
On phones with small internal memory capacity, there is a lack of free space. It is expanded with a memory card onto which photos, videos, music and other data are transferred. But what to do if there is not enough memory for programs, but there is nothing left to delete? The most rational option is to install applications on an Android SD card.
This can be done using standard tools or using third-party software. We'll sort it out simple ways, giving almost 100 percent results.
What applications can be transferred to a memory card?
Unfortunately, not all programs can be transferred to MicroSD. Some developers do not optimize the software to work outside of system memory, so there is no way to make it work on a memory card. However, the vast majority of software works well on it. Therefore, even heavy applications can be transferred, freeing up space on the internal storage.
Note! The system allows you to transfer only downloaded programs. It will not be possible to change the directory of the built-in ones - they will not start.
Also remember that the speed of writing and reading from a memory card is much lower than from the built-in drive. For this reason, it is not recommended to transport games and other software for which performance is important.
Transferring apps using stock tools
It has become possible to install applications onto a memory card using built-in services, starting with Android version 2.2; for earlier builds you will have to tinker and transfer using a PC.
Please note that the instructions are not completely universal. In some firmware, the names and locations of the items may differ, but the essence set out in the instructions remains unchanged. We will demonstrate transposition using the example of the AOSP system (naked Android) and the Samsung shell. We will also look at the nuances for versions up to 6.0 Marshallow and later builds.
For AOSP (up to 6.0)
Following these instructions, transferring one program will take about a minute:

The shell will notify you when the application has been moved to the memory card.
For Samsung (up to 6.0)
Now we want to show the differences in the procedure using the example of Samsung firmware, but at the same time substantiate the thesis that the principle remains the same. So:


Here, installing applications on the card is a little longer, but the main thing is to go to the program menu, select the one you need and interact with the storage options. The same principle will apply to other firmwares, it’s just that the first time you may have to spend a couple of minutes to figure it out.
For all firmware based on Android 6.0 and higher
In this Google versions reconsidered the principle of interaction between smartphones and flash drives. Previously, it acted as a portable data storage, now, in addition to this, it has been added new feature- Adoptable Storage. It integrates a memory card with internal storage, which is beneficial because by default all data will be installed on it. However, it will no longer be possible to insert it into your computer and easily transfer files.
To activate the mode, you need:

Try to make a backup of the data installed on the MicroSD, as everything will be deleted. Android will reformat it to suit its needs, add information encryption to improve security, and change the file system type. Consider carefully what will be more convenient for you, but remember that in the future you will be able to change the method of working with the flash drive, and the documents on it will be lost again.
Moving all data to MicroSD
Transfer individual programs useful. But what to do if your smartphone has little RAM and internal memory of 4, 8 or 16 GB and you urgently need to free it up? Android stock services will help with this too, because they provide tools for resetting all videos, pictures, music, software and even games to removable storage. To do this, take several steps, namely:

The method is simpler than the previous ones and is suitable if you want to radically free up space on your phone from programs that have been installed for a long time and take up a lot of space.
Transferring applications using third-party software
It happens that it is not possible to transport software using standard means, but there are many alternative options. We propose to disassemble the two simplest ones: one using a PC, and the second through special programs, but you will need root rights.
Note! Read about how to get root on Android in the topics about your device to avoid problems.
Using a computer
The solution is not the fastest, but it is simple and accessible to everyone, even if there is no root rights. So:

It's easier to do this through a device synchronization program, for example, My Phone Explorer. First it is installed on the phone from Play Market and then on PC. The distribution should be downloaded from the developer's official website.
Now start transposing the application to the card Android memory, for this you need:

This completes the procedure and the application is ready for use.
Using the app
A lot of transfer applications have been developed, we suggest using multifunctional utility Titanium Backup. To do this you need to do the following:

If you want to put all the software on a flash drive, then after starting Titanium follow these steps:

Now wait for the process to complete.
These were the most basic ways to install an application on an Android SD card, which will always work. If one of the methods does not help, we recommend using an alternative.
Lack of space on the internal storage of Android devices, which is set as the main storage by default, gives users many problems with saving downloaded information. That is why most owners of such gadgets end up trying to somehow solve the problem of how to download applications to a memory card. Android offers its own tools for this. However, you can also use some third party programs, which will be discussed separately.
How to download applications and games to a memory card on Android: general information
Before you begin to solve the main issue, you should clearly understand that downloading the installation distribution onto removable media is only the tip of the iceberg. But then you also need to make sure that the application is installed not on internal storage, but on an SD card.
If we talk about the problem of how to download directly to a memory card, “Android” systems of any modifications require the initial setting of parameters in such a way that instead of the internal drive, specify the external one by default. Only in this case, downloading programs from Google Play or the classic method using an Internet browser will be done on the card. First, let's look at the simplest methods for setting these parameters.
Pre-configuring the main storage
For installation necessary settings until the program is required to download. Typically, in the system you need to open the main settings menu of your smartphone or tablet and go to the memory section.

By tapping on it and calling up the appropriate parameters, you need to find a line like “Default memory” or “Main memory”, where a marker (checkbox) is placed opposite the SD card line instead of the internal storage.
But this is only a general case. For example, in some mobile devices ASUS first needs to use the individual settings section, in which you should find the application installation settings subsection and set the necessary configuration there.
Memory settings using the example of Samsung Galaxy smartphones
Let's look at another example of solving the problem of how to download to a memory card (Android 5.1), using the example of smartphones from Samsung.
Setting the memory used to load information by default on such devices is done through the Internet section, where you need to click the “More” button and then select the settings item (in some models of this line, instead of the “More” button, names like “Options” or "Menu").

Next in the settings you enter the section additional parameters, where the content options item is used. If it is not there, you can move on to the next step. Now all that remains is to set the SD card priority from the main storage drop-down menu.
Downloading applications using your computer: Setting the main option
Now directly about downloading information. One of the most simple solutions The question of how to download a game to a memory card of an Android system is to download using a desktop computer or laptop that has a card reader on board or can interact with mobile devices by connecting via a USB port.

In the first case, setting any special parameters will not be required, but for the second option, you need to set the permission for USB debugging on the gadget itself (without this, downloading and installation may not work).
How to download files to an Android memory card via a computer: two simple methods
With stationary computer systems the situation is quite simple. How to download applications or games to a memory card on Android devices? The optimal solution will involve removing it from the device and inserting it into the card reader using a special adapter, which is usually included when purchasing an SD card.

After this, it is enough to launch a browser or any other downloader in the system and in their settings indicate the location where the downloaded content will be saved, specifically selecting the external media. Do not forget that after removing the card after the download is complete, some programs may generate errors. For example, the uTorrent application reports that the previous volume is missing. Therefore, in this situation, the settings will have to be changed to those that were set before.
The second solution to the problem of how to download applications to the memory card of an Android device is very similar to the previous one. The only difference is that in this case the device is connected via a USB cable. Stationary computer system recognizes both internal and external storage. The parameters to be set next are similar to the previous situation.
Installing applications
Now let’s leave aside the question of how to download applications and games to a memory card on Android devices for now, and let’s look at the actions associated with the subsequent installation of programs on the device itself.
The main problem is that even when installing an application from an APK file saved on a memory card, the installation is performed exclusively on the internal drive. And there's nothing you can do about it. But when the card is displayed as the main storage on some devices, the problem of installing an application from Google Play is solved in no time. But what about manual installation?
Transferring applications to an SD card using system tools
To fix this problem, you can use mobile gadget management programs ( Samsung Kies, My Phone Explorer, Sony PC Companion, Mobogenie, etc.).
But on devices that have direct installation on external storage do not support, you will have to use programs for transferring applications from internal memory to external memory (again, if the gadget itself supports such a function). Actually, Android systems themselves have a similar function.

To call it, you need to use the main settings section and go to the installed applications menu. Next, simply tap on the name of the application that you want to move and select the line “Move to SD card.” After this, the transfer process starts. If the system displays a message stating that the device does not support this function, you will have to accept it, since even the most advanced programs will not help here.
Programs for moving applications to a memory card
But for those lucky owners of smartphones and tablets on which the transfer function is provided initially, we can recommend using programs like AppMgr Pro III or Link2SD.

Their advantage is that you can first bulk select the applications that need to be moved, rather than having to migrate each one individually. In principle, in this case, the download program will also not be needed. It is also worth paying attention to the fact that in some cases, for these programs to work correctly, you may need root rights.
What to do with your favorite applications and games for Windows?
Many users wondering how to download once popular games and programs that work exclusively on Windows systems to a memory card on Android devices also find a very original solution.

To get started, you just need to install a Windows emulator. Versions from Windows 98 to Windows 10 are now available. The most the best option installation of the seventh modification is considered, although the SD card itself will require quite a lot of space to save the image. But then in this environment you can launch a download or a standard installer, which during installation will behave like a regular Windows installer and offer you to choose a location by clicking the browse button. As is already clear, a location on removable media is selected, after which the program will be installed in this exact location.
Instead of a total
As you may have already noticed, the issues of downloading applications to external media are resolved quite simply. Problems may begin during the process of installing programs or transferring them to the card. But even here there are several universal solutions. True, if the device does not initially have this capability, no programs or root rights will help. At best, you will have to change the firmware to custom. But in most cases it is not recommended to conduct experiments with unofficial releases, otherwise the entire system may turn out to be completely inoperable.
The internal memory on smartphones is not endless, and photos, videos, documents and applications take up quite a lot of space. This is why most devices have an SD card slot - this allows you to significantly expand your memory reserves.
And yet, users are faced with the following problem: the phone has external storage installed, but all applications are automatically downloaded to the internal memory. Because of this, a notification constantly appears that there is not enough space. On Android, this problem can be solved in several ways.
How to download games and applications to an SD memory card
There are several ways to use external card to download applications and games to it. So, you can set the SD card as the default memory, move applications using standard settings or memory consolidation.
Setting the default external SD drive
You can set the SD card as the default memory, and then the smartphone will determine it as a priority for storing data.
For this:
Some applications will still be saved in the internal memory, this is determined by their settings.
Using Settings to Move Apps
Unfortunately, there is no option to select in the settings automatic installation applications to external media. But you can manually move some of them (not all applications support such a transfer).
For this:

There is another option: you can transfer applications not separately, but all together. For this:

Combining internal and external memory
This method is available for smartphones that have Android version from 6.0 and above.

Video: how to set up downloading games and applications to an SD card
Video: Moving games to an external drive using Apps2SD
Using an SD card and the methods described will help significantly relieve the internal memory of your smartphone. They are quite simple, so any user can handle them, even if he is not very well versed in technology.