Language for iOS applications. Programming for iPhone. Where to begin? Creating a connection between graphic elements and code
The profession of a programmer is one of the most prestigious and in demand, that’s a fact. In the development industry software have their own niches. Of these, the fastest growing, and at the same time the most highly paid, is software development for mobile devices. As you know, it just so happened that, leaving their competitors far behind, three constant rivals took the lead. The trick lies in such a way that one of these three is the undisputed leader, someone always catches up.
In the segment mobile technologies, without a doubt, Apple leads with its iPhone smartphone. At a presentation held in September, the Cupertino company demonstrated the 7th version of the mobile device. Along with it, Apple introduced new version mobile operating room iOS systems 10. Now it is the most significant operating system in the world, like its predecessors. It follows that learning iOS development is the best investment of time and money.
Apple ecosystem
Today we will develop a simple mobile application for iOS. Of course, a native Mac is best suited for this. But if you are a Windows supporter or simply don’t have a Mac, you can install the macOS operating system under a virtual machine in Windows. On the Internet, it will not be difficult for you to find a version of macOS specially tailored for PC, popularly called Hackintosh. Feel free to install it on a VMware virtual machine, VirtualBox - your choice. Let me warn you right away that the PC keyboard does not have some of the keys that are on the Mac keyboard, and many of their combinations cannot be pressed in Hackintosh. This pretty much spoils the mood. Otherwise, all the operations described below can be successfully performed on Hackintosh.
Required knowledge
To program in general and for iOS in particular, you need to know quite a lot. Mathematics and logic may not be needed at first, but they will be in demand later. Modern technologies relieved the programmer of the need to thoroughly know the computer architecture, but it was necessary to understand basic mechanisms such as number systems, their conversion, the speed of subroutines or the efficiency of algorithms (big O).
For more high level An iOS developer needs to have a deep knowledge of the macOS operating system and iOS itself. You also need to master the Apple programming language. Knowledge of Delphi, C++, C# or VB.NET will not help you much. Apple has its own ecosystem with its own languages: Objective-C and Swift. Of course, knowledge of C++ has never harmed anyone; programs and inserts based on it are found everywhere, even at Apple. But the most used by definition is Objective-C, simply because it appeared much earlier (in the mid-eighties of the last century), while Swift only two years ago (in 2014). Apple has high hopes for new language and invests a lot in it. Objective-C is used to support the old software, and the new one is written in Swift. So it's good for you to know both.
In order not to waste time, all these programming languages can be learned under the strict supervision of teachers on the website.
Development Tools
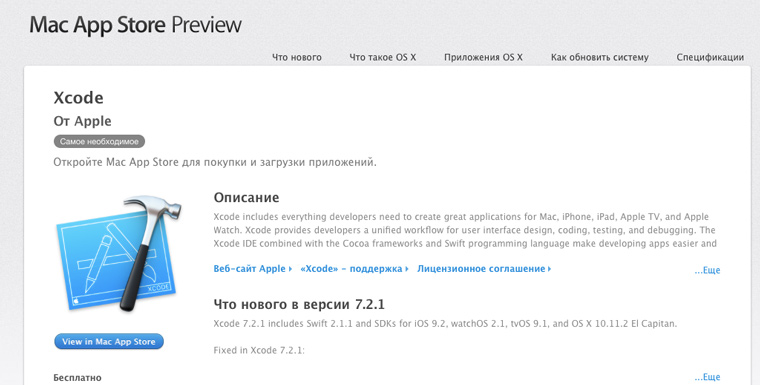
As you know, the main developer tool for macOS and with it iOS is the programming environment Xcode. It includes tools for creating applications for Mac, iPhone, iPad, Apple TV, Apple Watch. All Apple platforms. Xcode contains the Interface Builder, a code editor that supports all modern code tools. In addition, without leaving Xcode, you can test the application; if it is developed for external device, then you can run it in the emulator.
The system includes emulators of all devices, new versions of which can be downloaded. In addition Xcode contains graphic tools to analyze application performance, including tools for diagnosing CPU load, storage usage (HDD, SDD and others), load on the graphics adapter (from the OpenGL side).
On September 13, a new, hotly anticipated version of the development environment 8.0 was released. Stable versions can be downloaded for free at App Store. Alphas and betas are distributed by developer subscription. The eighth version includes: a new version of the Swift 3 language, the Swift Playground learning tool for iPad, a new version of Interface Builder, which has become faster and allows you to view the application layout on different platforms, without having to deploy the application itself to the simulator.
With Xcode 8 you can develop applications for macOS Sierra, iOS 10, watchOS 3 and tvOS 10. All SDKs are available. New versions of operating systems began to appear consistently right after Apple presentations, held in early September.
Objective-C language
Let us briefly recall the basic information about the language. Objective-C is a compiled object-oriented programming language used for writing applications for Apple systems. It is a superset or, in other words, an add-on to C, inheriting from the latter syntax, data types, methods of monitoring the progress of program execution and adding to it the capabilities of object-oriented programming - a description of classes and methods.
As in C++, in Objective-C the central role is played by objects, which are associated with four paradigms: abstraction, encapsulation, inheritance, polymorphism. C++ is a strongly typed language, while Objective-C is weakly typed or has a dynamic data type system. Like Smalltalk, Objective-C sends messages to objects. This is an exceptional feature of dynamic languages because the type of objects is checked at runtime rather than at compile time.
The description of the Objective-C language takes up more than one voluminous volume. Therefore, in order to gain objective knowledge, it is convenient to take the “” course. An entire section of the course is dedicated to this language.
iOS application development
As a sample we will develop a very simple application. Let us not deviate from the sacred tradition, let us greet the world. However, taking into account the fact that we graphic application, we will diversify it a little: we will add a button, when clicked, we will display or hide the inscription “Hello, World”.
Launch Xcode, in the window that appears, select Create new project or in the main menu File -> New -> Project. The next window will ask you to select the target platform and application type.

In this case, we are interested in the iOS platform. There are seven types of applications to choose from. Six of them are templates for typical applications. operating system iOS, which by default contain a different set of components. The seventh type is play.
Application Types
- The Single View Application template is intended for simple application with one screen. The preset includes a View Controller component, which allows you to customize the appearance of the application using the Interface Builder form designer.
- Master Detail Application creates an application that displays a collection of objects in a table view. After selecting one of them, detailed information about that object is shown. The first view is the master, the second is the detailing.
- Using Page-Based Application, you can create applications that have multiple screens, like pages in a book. Consequently, e-readers are created from this blank.
- Tabbed application allows you to create applications where each screen can be switched to at any time, that is, each screen has its own button to activate it, on which the title is displayed. An example is iTunes.
- Game is used to create a game template. There are four frameworks to choose from for creating a game: SpriteKit, SceneKit, OpenGL ES, Metal. Let's look at them briefly.
SpriteKit is a system for 2D rendering and animation of textured rectangles - sprites. When displaying frames, a standard loop is used, the frame is displayed after all the contents of the scene have been processed.
SceneKit is a high-level visualization framework 3D graphics without the help of OpenGL. It supports loading, manipulating 3D objects. It includes: a physics engine, a particle generator and easy way scripting.
OpenGL ES is the industry standard computer graphics. Allows you to visualize 2D and 3D scenes. Allows you to describe the pipeline for a video card: vertices undergo transformation, are assembled into primitives, which are rasterized into a two-dimensional image and displayed on the screen. Programmable shaders can be included in the pipeline.
Metal is a low-level API that will allow you to get the most out of your video adapter. Streamlined APIs along with precompiled shaders and multi-threading take your game to new levels of performance and quality. - Sticker Pack Application is a new type of application introduced in iOS 10 and Xcode 8. It is a set of simple or animated images used in the new iMessage. It does not require coding to create it.
- iMessage Application is a new type of application that appeared in iOS 10 and Xcode 8. Allows you to create add-ons for iMessage, for example to purchase and download your sticker pack. You can also use the iMessage API to create your own analogue this application, including playing audio, video, using stickers and more.
Creating the first project
As a template for our application, we will select Single View Application. Since we won't develop big program, the funds provided by this provision will be enough for us. Click Next. On the next page of the wizard, you need to enter a project name, for example ShowLab. In the Language drop-down list, leave the default language selected - Objective-C. Next, in the Devices drop-down list, leave the Universal selection. Here you determine for which device (iPhone or iPad) the application is being created. The Universal clause means for both. Let's uncheck the Include Unit Tests and Include UI Tests boxes; we don't need any tests. Next. Select a folder to save the project. Now click the Create button.
As a result, a window will open with a list of all parameters applied to the project. In this window, you can change the parameters previously set in the wizard: orientation, target device, etc.

First we need to create the application interface. To do this, select the Main.storyboard file in the list on the left with one click (if this file is not visible, expand the contents of the ShowLab folder). To the right of the list, the entire window will be occupied by Interface Builder. The device layout will be displayed in the center. In the lower right corner of the window there is a component panel. Drag the Label and Button components from there onto the layout. Above the component panel is a list of properties. If you don’t have it, click the Show the Attributes Inspector button, located under the window title on the right side of the interface.
Select the Label component in the layout and configure its Text property: leave the Plain selection in the drop-down list, enter the desired inscription in the line below, in our case “Hello, World”. If the text does not fit within the borders of the label, change them by dragging the handles on the edges of the component. To centralize it horizontally, go to the Size Inspector page by clicking on the Show the Size Inspector button (to the right of Show the Attributes Inspector). On this page, from the Arrange drop-down list, select Center Horizontally in Container.
Now select the Button component, change its Text property to the desired label - Switch. You can center it in the same way as described above.
Creating a connection between graphic elements and code
In Visual Studio (or Delphi), an object in the code is created automatically the moment you place a visual component on the form. This doesn't happen in Xcode, but it doesn't cause problems.
Open the contents of the ViewController.h header file in a separate window by double-clicking on it. This file contains a declaration of an extension of the UIViewController class, marked with the @interface keyword. This feature was added to the second version of Objective-C. Now do this trick: move the mouse cursor to a component - a text label, hold down the Ctrl key and left button mice. Move the cursor to the window with the code (file ViewController.h), a blue line will follow the cursor. Release the mouse and key inside the ViewController interface description.
The Outlet creation window will appear.

This is a property of an object that refers to another object (in this case, a visual component). You need to enter the name of the Outlet object, by which you will access the visual component, let it be lab. Next, the object type is selected, it is selected correctly: UILabel.
Even lower in the Storage list, select the type of object reference: weak or strong. If you choose strong, the object pointed to by the property will exist as long as the property points to it, in which case it will not be automatically deleted when it is no longer used. On the other hand, when a weak reference is in effect, the object can self-destruct. So, select the weak link type and click the Connect button. As a result, the following line will be added to the code:
@property (weak, nonatomic) IBOutlet UILabel *lab;
Let's make sure that Outlet is a property.
Now let's create an Outlet for the button. The algorithm remains the same. Only for the Name property you need to enter a different name, for example but. The line will be added to the code:
@property (weak, nonatomic) IBOutlet UIButton *but;
As a result, we have two pointers to visual components: lab and but - respectively, an inscription and a button. Now, using pointers, we can manipulate components in code.
Then you need to create a button click event handler. To do this, open the implementation file ViewController.m in a separate window. In exactly the same way as you dragged the line into the header file to create the outlet, from the button, drag the line into the implementation file and drop it to the closing command bracket - @end. A window for creating an event will appear, similar to the window for creating an outlet. You see the difference: a link to an object is created in the header file, a method is created in the implementation file.

Fill in the Name field, its value represents the name of the property - method. Let it be onClick. Leave the Type field value as default - id. In Objective-C this type is the ancestor of everyone else. In the Event drop-down list, the Touch Up Inside event is selected by default, which occurs when the pointer (mouse, finger...) is released over the button, that is, the final stage of pressing the button. That's what we need. In the Arguments list, leave the default value: Sender is the object that sent this signal, in our case it will always be a button. Click the Connect button. As a result, the following code will be added:
- (IBAction)onClick:(id)sender ( )
A minus at the beginning means a closed method (private). Keyword IBAction tags the events (methods) of visual components from Interface Builder.
Between the command brackets we will write the code that is executed when the button is pressed:
Lab.hidden = !_lab.hidden;
In this line of code we invert the value of the hidden property. It is of type BOOL, which has two values: YES - true and NO - false (somewhat unusual for Windows programmers, where true and false).
Pay attention to the underscore character before the name of the object - the label (_lab). Without it, compilation will fail. The underscore is added automatically for objects contained within other objects; that is, in this case, the lab object is contained in the ViewController object. Previously, this was a convention used to distinguish between objects declared as members of a class and local objects. And now this is a strict rule implemented in the language compiler.
Now you can compile the application and run it on the simulator. We chose the iPhone 7 simulator included in Xcode 8. The compile and run button is a black rectangle and is located in the bar at the top of the interface.
After compiling the application, launching the simulator and loading our application, its interface will be displayed on the simulator screen: the inscription “Hello, World” and the Switch button. If you press the last one, the inscription will disappear; if you press it again, it will appear again.
We have made a very simple application to understand the essence of iOS development. You can learn more detailed information about creating iOS applications in Objective-C from the course by our friends from GeekBrains “”. The course devotes two months to learning this language. During the first month - introductory topics, and in the second - real coding of professional applications.
Swift language
In 2014, Apple introduced a new programming language - Swift. It quickly became the most talked about and fastest growing language in the world. This is a reliable, secure, intuitive language for developing applications for the macOS, iOS, tvOS and watchOS operating systems for the entire fleet of Apple devices. Swift is an efficient programming language. It's easier to learn than its predecessor, Objective-C, and Swift borrows some of its best ideas. At the same time, the developers have made the languages compatible, that is, one program can contain code in both Swift and Objective-C. There are billions of lines of code and hundreds of thousands of legacy programs written in Objective-C in the world, so its support will definitely not be abandoned.
When developing Swift, the goal was to create the most convenient system programming language - fast, safe and expressive.
The algorithm in Swift is 2.6 times faster than the same algorithm in Objective-C, and 8.4 times faster than in Python. Using Swift makes the program development process more flexible and convenient.
Due to its exponential development, Swift was released to the community on December 3, 2015 open source. At the same time, Apple strictly monitors its development, organizing a committee for its development. Now Swift is available not only in Apple systems, but also on Linux. All additional tools for working with the language, including a debugger, standard library, package manager, are also free and open.
This language is the future. You can find out more detailed information about it from the mentioned course from GeekBrains “”, in which a whole month is devoted to learning this programming language.
App Store
Simply put, the App Store is a content store for the entire range of Apple devices. Here you can buy games and applications from both large companies and independent developers. Every developer, no matter what country he lives in, can sell or distribute his programs for free on this digital distribution platform. To start doing this, you need to register as a developer and buy a license to sell your applications. This is a fee for the service provided and the development of the App Store.
Results
We have developed a simple application for the iOS mobile operating system using the Xcode programming system along with the Objective-C language. We tested the finished application on an iPhone 7 simulator. We learned how to build a user interface using Interface Builder, how to associate graphic elements with application code, and how to create event handlers. We got acquainted with the basics of Objective-C. In addition, we drew attention to the promising Swift language, used to develop powerful and secure applications for the “apple” ecosystem.
However, the material studied is only the beginning. In order to intensively upgrade yourself in the direction of mobile coding and the development of actually selling applications, we recommend taking the “” course on our friends’ website.
This is a worthy course: if you take it, you definitely won’t waste your time. It starts with two detailed courses on the Java language, followed by learning basic programming for the mobile operating system Android system. Further course on databases in general and SQL language in particular. Then an in-depth course on developing professional Android applications. After this, the vector of study will move towards Apple systems: two detailed courses on the Objective-C language and a useful course on Swift.

The course lectures are taught by professional teachers with extensive experience in software development. If something is unclear, you can ask a question without delay. In general, learning on GeekBrains is a live process, you can communicate, ask questions, and help with answers. To test the acquired knowledge, teachers issue homework, which is then checked. After completing the training, you will have a guaranteed internship in an IT company. And then everything depends on you, if you show yourself as a competent specialist, you will be invited to work.
Special project with the company
And with this article I start blogging on programming for iOS. And in the future also for OS X!
Why do I need it? Not long ago I became the proud owner iPad Retina. I liked him quite a lot and was pleasantly impressed! I even began to understand the “Applephiles” with their constant desire to purchase all Apple products that are released. But it’s one thing to acquire someone else’s, and another thing to create your own! And this thought led me to create this site about programming applications/games for Apple products.
Who is this blog for? First of all, it is for those who love to program and create. It's quite possible that you've never programmed in Objective-C(this is the programming language used), but really want to get started. However, it is advisable that you know some programming language, for example, Excel macros, QBasic, C++, C#, 1C in the end. Those. Having a mathematical mind will help you a lot. If this is not the case, it’s okay. The blog was created for beginners like me. Naked enthusiasm I will try to explain in a simple, accessible and interesting way, just as I like.
A few words about the programming language. Reviews on the Internet agree that this language is convenient, not complicated, interesting, and more “logical” for a person than the languages of past generations. Therefore, if you have the desire and passion, you won’t be bored!
Again, from reviews on the Internet and from my own experience using applications from the AppStore, I realized that Design Applications come first. It even outstrips the functionality of the program. That is, if your program is very cool, but looks ugly, then it will not gain popularity. Therefore, it is necessary to pay great attention to the design of the application, creating a beautiful Interface programs, which means working in Photoshop, maybe consulting with designers (or studying design aspects on the Internet).
Remember: Interface And Design in our applications must be at the highest level!
Why create applications/games on iOS? There are two options here:
1. For yourself. You have an iPhone/iPad and can't find an app that suits your needs. Create it yourself! You can implement any of your “wants” in your application and enjoy it!
2. For everyone. This question is already more interesting. After all, you can be a good fellow and give away interesting applications/games for free. Or you can sell it for $1-$100 If, of course, they want to buy it :) I think the latter will be the majority. By the way, Apple takes 30% of sales revenue
One way or another, there are 2 ways to develop applications:
1. Free. You develop an application, test it on emulators of the development environment XCode and don’t take it beyond the operating system. Even on your own own phone you won't be able to deliver.
2. Paid. You develop an application, test it on emulators of the development environment XCode and buy:
A. iOS Developer Program - $99 per year if you want to create free or paid applications for iPhone, iPad, iPod touch, and distribute through the AppStore. (what we need in the future!). And also test them on your devices.
b. iOS Enterprise Developer Program - $299 per year, if you want to develop in-house applications - applications for internal use in your company, without public access.
As a result, we have: at the beginning of our journey, we just need to create applications and see how they look in emulators. As soon as we feel confident in ourselves, we buy the iOS Developer Program and, forward, to the world of the AppStore. I will provide registration instructions later, as soon as we need it.
For information: Once you become a subscriber to the iOS Developer Program, you are required to pay an annual subscription fee. The subscription can be renewed within 60 days after the end of the previous one. If the subscription is not renewed, you lose the right to distribute applications through the AppStore, and your developer certificates will be deleted. To top it off, all applications that you downloaded to the AppStore will also be deleted.
On the other hand, when deciding to become an iOS developer, you should be sure that you are going to make a living from it. And the amount of earnings will more than cover your subscription costs.
We'll talk about this later
And now I will talk about how we will learn programming. I will make (“post”) entries with new lessons at a certain time interval. We will study only what we need in this moment. There will be no unnecessary general information unless we need it at this stage. Text lessons. Why video lessons are not convenient for me: firstly, you need to record your voice), secondly, you can’t copy part of the code from a video lesson, so you have to retype it, thirdly, if you listened to something, you need to “rewind”, etc. .p., which takes much more time. + the text can be edited quickly, but the video can take a long time to reshoot. Therefore - text.
Regarding the information that is on the Internet. It exists, but it is either outdated or in English. Those who are fluent in English are welcome to the official websites of the developers. For those to whom Russian is a native language - welcome
Without financial investments and special knowledge.
Here simple instructions, how to create a basic iOS application and try it on your device. Based on it, you can go further into the topic and create really useful programs.
Note for Windows users: to create applications for iOS you need to install OS X on virtual machine(VirtualBox, VMware). This process is by no means simple and requires separate instructions.
1. Go to the App Store and install XCode development environment :
If you already have XCode, then you need to update it.
2. Launch xCode and select the menu item File -> New -> Project: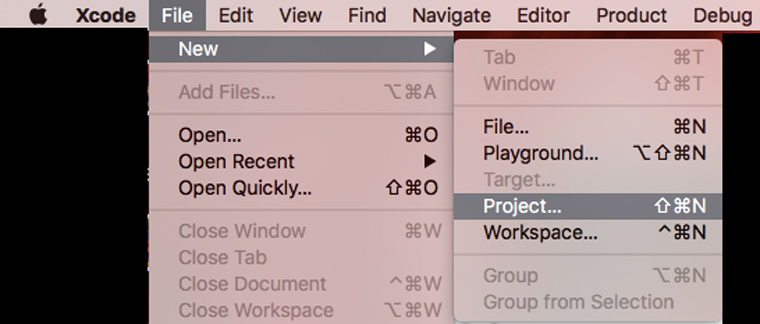
3. Select the platform and application type:

4. Provide information about the project. Please note that we have selected the application type “Universal”: 
5. Click on the button New Folder and indicate the name of the folder in which we will store the application files:

6. Uncheck the Create Git Repository checkbox and click the Create button. As a result, you should get to the start screen for working on the application: 
7. Click on the item Main.storyboard in the right menu, drag the element to the main field Label and add text to it Hello_world:

8. Now we need to make an icon for the application. We select an image and upload it to mapappicon.com:

9. We wait for the web application to finish working and indicate your address Email to get an archive with icons:
![]()
10. Return to XCode and select section in the left menu Assets.xassets:
![]()
11. Open the archive from the mail and drag icons from there to working space XCode:
![]()
12. Select one of the device simulators, click on the application launch button (black triangle) and turn it on on your Mac Developer Mode:

13. We try to start again. We are waiting for iOS to load on the simulator:

14. Make sure the application is working:

We look at the finished application on the device
Now you can see how the application works on the device. Before following the instructions, make sure that you have the latest versions of XCode and iOS.
1. Let's go to xCode -> Preferences -> Accounts and add your Apple ID:

2. Connect the iOS device to the computer:

3. Choose required device in the list and click on the start button. We're waiting for a while.
4. If a message about security problems appears, then on the iOS device go to Settings -> Basic -> Device management and allow applications from the developer to run with your Apple ID:


5. Go to the desktop and find the new application icon:
6. Launch:

7. Disconnect the device from the computer. Now the application can be used.
What to do if you want more?
Using scientific poking and Google, you can expand the above sequence of actions and create more functional application. But you can only use it on your own devices.
After all, Apple places very high demands on applications. The App Store Review Guidelines include 29 points and more than a hundred sub-points. In order for an application to comply with them and be accepted for publication in the store, the developer requires a large amount of technical knowledge.
If you want to create high-quality iOS applications intended for mass use, you need to learn!

Even if you are an experienced programmer, you often have a desire to learn (or at least get acquainted with) new languages or improve your knowledge of old ones. As a rule, there is no time to do this at the computer. Or maybe in the evening, look through it on your favorite iPhone or iPad...
We offer you a small list of books and applications for learning different programming languages on iOS.
itReads
Specialized store of electronic IT books. Collected thousands of the best books about programming, startups, business, project management, coding.New books will be delivered to the store automatically.
StartCode IT

Web development courses in your pocket. Includes more than thirty programming lessons with practical exercises. The material is presented simply and clearly, with a touch of humor, so it will be easy to learn. And after each theoretical lesson, you will create a website - from simple to complex.
Tests and more than 60 practical tasks.
Python Tutorial

An application for those who want to learn this popular and very interesting language. The application contains lessons for beginners, a course on Python 3.4, and a guide to game development.
Requires iOS 8.0 or later. The application is compatible with iPhone, iPad and iPod touch.
Lrn

HTML, CSS, Javascript, Ruby, Python are the languages you can learn with this app. Basic concepts that will be useful not only to those who want to be a web developer, but also to those who want to be a little cooler than other Internet users.
Application on English language.
Requires iOS 7.0 or later. The application is compatible with iPhone, iPad and iPod touch.
Learn Python

Another app for learning Python. Suitable for both beginners who want to learn the basics and those who want to deepen their knowledge.
Application in English.
Requires iOS 8.0 or later. The application is compatible with iPhone, iPad and iPod touch.
Swifty

And this application is for those who want to learn another popular language - Swift. Includes more than two hundred manuals in English and German.
Requires iOS 7.0 or later. The application is compatible with iPhone, iPad and iPod touch.
“But today is a special occasion - I wanted to highlight 10 best apps, which programming enthusiasts should pay attention to. There are educational applications, one game for programmers, compilers and code editors.
Pythonista 3 is a program for writing applications in Python language. An interesting fact: the name of the language does not come from the reptile python, but from the name of the British comedy show Monty Python's Flying Circus. Python is just in English Python.
Some people think that Python is a great first programming language. Maybe that's true. The language has a simple and understandable syntax and at the same time a large number of functions.
Python is a popular language used by many large companies. For example, Google and Facebook use it in their projects. Pythonista 3 allows you to write a program and run it immediately.
Programming language “smart BASIC”
An application that offers the user to program in an advanced version of the most popular language for learning – Basic. It was with Basic that my acquaintance with programming began about 20 years ago.
Even though many advanced programmers don't understand Basic at all, I think it's a good language for beginners. It is very simple and at the same time, in skillful hands, can solve a lot of problems.
Our reader Alexander, an amateur programmer, even previously created applications in Smart Basic, which were published in the App Store.

Apple developed the Swift programming language for iOS and Mac OS programmers. Apple conceived Swift as an easier and more readable language to learn than its predecessor, Objective C. In 2014, the language was implemented in Xcode. And in 2016, Google announced that Swift would be the first language for Android. Most likely, this will have a positive impact on the speed at which applications are released for Android. There will be fewer exclusives and applications that are released first on iOS, and after a few months/years on Android.
Swift Playgrounds from Apple themselves allows even a beginner to immerse themselves in the world of the language. Learn new designs, study how code works using live examples in a playful way.

Series “Learning Programming Languages” from Sololearn
I recently came across a series of entertaining apps from Sololearn that offer interactive lessons for learning programming languages. The following languages are available in Russian: JavaScript, HTML, C++, Python, Java, CSS, SQL, PHP, C#, JQuery, Ruby. Swift lessons in English.

I've taken a few JavaScript lessons. Everything is very accessible and interesting. Mini-lessons are given with examples that you can immediately run in the emulator. This is usually followed by a question with multiple answer options or the opportunity to enter a text answer. Very clear and convenient for beginners.
There are code examples and the ability to run them:

All applications are free and without in-app purchases.

Textastic Code Editor 6
There are two decent text editors for code in the App Store. Textastic, with its price of 749 rubles (10 dollars in the American App Store), is budgetary option.
Textastic supports the syntax of about 80 programming languages. The program is used for beautiful display and editing of texts. This is not a compiler - please note. The application works like this: you download the code, edit it and then upload it back.
Coda
And here is a more expensive and advanced option text editor. For 1890 rubles you will get everything in one.
- Code editor with syntax highlighting and convenient editing both online and offline.
- Support for many popular languages.
- Support for network protocols (in particular FTP) and, most importantly, the SSH terminal.
- Synchronization between iOS and Mac (version for Mac OS can be purchased on the Panic website).


I recently came across an interesting reference application that contains code examples in 6 programming languages: Swift, Java, C#, Python, C++, Objective C. Its essence is that a person can quickly find a piece of code in the language he needs. For example, a programmer needs to quickly remember what an error handler looks like in C++. He looks at the program and finds the desired fragment that he can use in his program.

The application developer has collected examples from these 6 programming languages and, judging by the updates, also updates them constantly.

The program is shareware, but full version costs only 2 dollars.
Codea
Codea appeared in 2012 as the first application in the App Store that could be used to write applications for iOS. The program is still being updated to this day. Codea uses the Lua programming language, which was invented in Brazil and is most similar in ideology to JavaScript.
Codea is designed to make programming for iOS easier. That is, the goal of the developers was to visualize the process and make it more convenient due to this.

As an example, the developers have posted a very good, completely free game, Cargo Bot (written in Codea), on the App Store. In it, you need to rearrange the colored boxes using a manipulator arm to get the desired arrangement. To do this, you need to come up with algorithms using available commands.

Hopscotch: Make Games
Another application for creating games. Inside are convenient (shown in a small window) training videos that will help you create your first games in English.
In the application, you can select objects and create actions for them. The result is simple arcade toys. I tried a few people created. I wasn’t particularly impressed, but we need to make allowances for the amateur level of users.

The program is good for everyone, but a subscription of 5,000 rubles a year is beyond good and evil. Therefore, the only program in this top 10 that I included was based on the principle: “Cool! Readers need to watch it.” I can’t recommend it with such a price tag.