How to restore a non-working or poorly functioning smartphone. Step-by-step recovery of Iphone Restoring iPhone 4 via iTunes no memory
Sometimes you may face a lot of problems as an iPhone user. For example, you accidentally delete iPhone, update your operating system but lose some valuable files, or restore old iPhone data from a saved backup file due to buying a new one.
If you are facing the above problems, you may be thinking "how to recover my iPhone data in the easiest way."
The reason iTunes doesn't want to restore iPhone
Although iTunes seems really in a good way provided by Apple to help you recover iPhone data from a backup file, there may be some problems that may occur when using iTunes for recovery.
- 1. If you don't have enough time to back up your iPhone data in iTunes, there is no option to restore your iPhone using iTunes.
- 2. If your hardware has some problems, it will show you an error message. For example, your cable does not work well when connecting your iPhone and PC. If you have security settings/software installed on your computer that has a big impact on how your phone communicates with Apple's update servers, you need to try to update it again and again.
- 3, iPhone will not recover data to iTunes after a failed jailbreak attempt.
- 4. When you recover iPhone data using iTunes, it has the possibility of the recovery stopping suddenly when the download bar disappears and an error message appears.
There is another unfortunate possibility that iPhone users encounter when they restore their iPhone using iTunes.
To avoid unnecessary problems, this article will introduce you to the easiest way to solve “how to restore iPhone without iTunes”.
How to Restore iPhone without iTunes
iOS Data Recovery is a third-party software that can do what only iTunes does, even has more powerful features in recovering iPhone data without iTunes. You can use this program to restore iPhone directly and from backup files without iTunes.
Part 1: Restore iPhone Directly
Install the software and open it.
Download this iPhone recovery software (it supports Win and Mac). Open it and connect your iPhone to it. Select " Recovering from an iOS Device"which can help you restore iPhone without iTunes in the easiest way.
Attention: When you open the software, you can see three options on the main interface. Besides recovering from iOS device, you can also choose "recover from iTunes/iCloud backup file" to automatically recover iPhone data by this software. (You can read part 2/3 to learn how to restore iPhone from iTunes/iCloud backup without iTunes app)

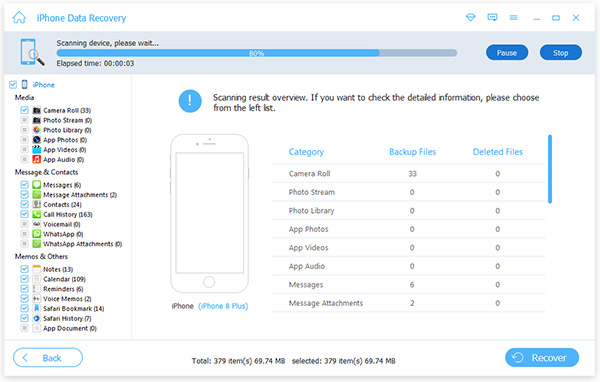
Start scanning your iPhone
If successful iPhone connection click " Start scanning"to scan your iPhone. There is a process bar on the top interface that shows the scanning speed.

View and Recover iPhone Data
On the left interface, you can see the file classification list. Click the data you want to recover, such as "Contacts", you can see all detailed information about the middle and right interface. Then you can preview you wanted it.
When you are sure that all the files you want to recover, you just need to click the " Restore“A dialog box will appear asking you to specify the path to save the recovered file. Then click "Restore" again to finish it.
Note: In the left interface there is 18 file types you can view and recover, such as text messages, photos, notes, and more.

Part 2: Restore iPhone from iTunes Backup without iTunes App
You can restore iPhone from iTunes backup with this software and without iTunes app.
Scan iTunes Backup File
When you enter " Recovering from an iTunes Backup File", select which device you want to restore if you are backing up various device data to it. Click "Start Scan".
Recover iPhone Data Before Watching
Select the file you want to recover and view them if you need to recover, click " Restore"and select the path to save it. After that, click the "recover" button to recover iPhone data on computer without iTunes.

Part 3: Recover iPhone from iCloud Backup File
You can easily restore iPhone from iCloud backup using this software.
Apple has long been known as a high-quality manufacturer of high-tech devices that work with using iOS(iPhone, iPad and iPod). However, the more complex gadgets become, the higher the likelihood of random failures in their operation. Therefore, it is extremely important for users to have backup copies of their data, which can be restored if they are forced to reset the device to factory settings or when updating the software. Recovery Mode ( Recovery mode) will allow you to return your phone to normal operation. Typically, to restore the operation of any of its gadgets, Apple recommends using iTunes application. However, users often encounter a situation where iTunes cannot recognize the device or spends too long in recovery mode. However, you can restore your iPhone in other ways, for example via the Internet, connecting to iCloud, and also using third party applications. Let's consider several options for solving this problem.
Method 1. How to restore iPhone using iCloud
One of the common methods for restoring iPhone is using iCloud storage. First of all, you should take care of good internet traffic, since a significant amount of data will be transferred. It is then recommended to create a preliminary copy of the current data. To do this, in the settings you need to go to the “iCloud” > “Storage and Backups” section and enable backup (if it is disabled) by tapping “Create a copy.”
Now you can proceed directly to restoring your iPhone to factory settings. You need to reset the device, deleting all settings and user files. To do this, in the smartphone settings you need to go to the “Basic” section > “Reset” > “Erase content and settings” mode. Click "Erase iPhone".

Restart the iPhone, when booting, select the “Recover from iCloud copy” setting mode.
Confirm your choice, wait for the download to complete, your phone's user settings and saved data will be restored from the previously made copy.

Method 2. How to restore iPhone using iTools
This utility is the most famous analogue of iTunes. To work, you need to download the iTools program, install and run it. Connect iPhone to computer. If the gadget is detected in the program, go to the “Tools” section, click “ Backup", in the window that appears, check the boxes with the types of files that need to be saved, click "Next", wait for the content to be determined. You can pre-specify the folder to store the backup using the Edit function. Click “Run” and wait for the result. Unlike iTunes and iCloud, this application does not encrypt files, which gives you access to viewing and using photos without additional software. Unfortunately, it does not always detect the gadget.
Method 3. How to restore iPhone using CopyTrans Shelbee
If you have the CopyTrans Shelbee program on your computer, you can use it. Naturally, the procedure will be similar to the previous one. First, a preliminary copy (backup file) is created with all current settings and personal information: contacts, messages, calendar entries, notes, photos and videos. The iPhone is connected to the computer, CopyTrans Shelbee is launched. Select the “Backup” item. Select the “Full backup” mode. By default, the backup will be saved in the folder with backup files created by iTunes. To change its storage location, you need to click on the pencil icon and indicate the new location. Click “Start” to begin the procedure. After copying is complete, click “Done”. You can later restore data from the created backup copy.
If recovery is necessary, first reset the iPhone to factory settings in the same way as the previous option with iCloud. Then connect the smartphone to the computer, call CopyTrans Shelbee, and click “Restore” in the start window. To change the current folder with backup files, click on the pencil icon and specify a new path. Select the latest date or the copy you need. Start the recovery process and click “Done” when finished.
Method 4. How to restore iPhone using ReiBoot
A great program not only does the same job, but does it much easier, literally in one click. In addition, it functions in difficult cases, for example, when the smartphone freezes during recovery mode, cyclic reboot mode, DFU mode, etc. Moreover, it performs its function without data loss or damage and supports all iPhone/iPad/iPod devices with iOS of any version, including iOS 12!!!
Download from the website and install Tenorshare ReiBoot on your computer. Launch the software to get started. The program has a menu for selecting the language of communication. Connect your iPhone (or iPad, iPod touch) to your computer using a cable (if a message appears on your iPhone, click “Trust”).

The program itself prompts further actions, identifies the gadget, and opens a window with two main functions: “Enter recovery mode” or “Exit recovery mode.”

All the user needs to do is select the desired option, after which ReiBoot will do everything itself in a short time.

If after this the device still does not work, click the “Fix Operating System” button and update to Tenorshare ReiBoot Pro to fix the iOS system.

For particularly meticulous perfectionists, there are some instructions for users on the developers’ website, and several video instructions on YouTube.
There are probably a dozen more similar ways to solve the problem. But still, one of the most successful solutions is ReiBoot. You can download the program for free from the developers; if you wish, you can find others here useful programs for every taste, including the extended version of ReiBoot. Information on the site is in Russian.
Recently, the issue of updating software or flashing iPhones has increasingly interested owners of Apple devices. There is a lot of information on the Internet about how to carry out these manipulations yourself, but very often these instructions miss the nuances associated with system errors during the installation process operating system. This article describes cases when an iPhone cannot be restored and what can be done if such failures occur.
In fact, there are many reasons for refusing to restore a gadget through iTunes. This could be either problems in the hardware of the device, or a banal outdated version that does not allow you to restore the iPhone via iTunes, the appearance of error 9, or an incorrect reset of all settings. Below are the main variations of faults with a detailed analysis of each of them.

The very first thing you need to do is iTunes update. To do this, open the program and check it for new versions. If you can’t roll back your phone through iTunes, you can simply delete the application and download it again from the official website, checking the latest version iTunes programs. How to download new version iTunes, you can find out by going to
As trivial as it may seem, a simple reboot can help out: both the computer and the Apple device itself. While you reboot your PC standard method, take the phone and simultaneously hold down the Power and Home buttons for 10 seconds, after which the smartphone will reboot. Now try connecting again and starting the recovery process.
For older iPhone models

For new models (8, 8 plus, X)

Replacing the usb cable
First, you need to make sure that the connection is made using an original and certified cord. The fact is that if you use non-original usb cable, then it will provoke a refusal to install the firmware. If everything is fine, but the process still does not start, carefully inspect the wire and connector for damage.
Using a different USB port

Very often people connect a device through ports located on the keyboard or other peripheral devices and they are surprised that they cannot reflash the device. Try connecting your iPhone through another USB port located on the back of the system unit.
Cleaning the PC
This procedure will require a little effort. You need to remove programs and components to iOS devices, which are installed on your computer or laptop. Go to the “Control Panel” and go to the “Programs and Features” section, then uninstall all Apple apps, while confirming the erasure of all additional files.
Don't forget to uninstall iTunes as well. Since in any case you will have to download all the necessary utilities again, restart your PC before installation. After completing the procedure, you can start updating the smartphone firmware again.
Editing the hosts file
When updating or renewing an Apple device, iTunes will certainly contact Apple servers, and if this fails, you can safely assume that the hosts file has been changed on the PC.
Typically, the hosts document is modified system viruses Therefore, before resuming the startup hosts file, it is preferable to check the laptop for the presence of virus threats. This can be done either through an antivirus by running the recognition mode, or with the support of a special utility Dr.Web CureIt, which cures necessary files. If problems remain, move on.
Disabling antivirus

Thanks to excessive care antivirus programs, they can block certain processes, even absolutely secure applications. iTunes may also be included in this blacklist, which will lead to interference and failures, which is why, during recovery, it is not possible to roll back iOS to the latest normally working version. First, add the snail to the antivirus exclusion list; if this does not help, then disable the blocker completely and check the result.
Recovery via DFU mode
This mode is intended for emergency resuscitation of Apple gadgets. To use it, follow the instructions below:
- First, completely turn off your phone and launch the iTunes application on your computer.
- Next, connect the device via a USB cable to the port and turn it to DFU mode.
- To do this, hold down the “Home” and “ON” buttons at the same time. Both buttons cannot be released for 10 seconds, after which the “ON” key must be released and the second button held until the iPhone appears in the program on the PC.
- The application will notify you that you can begin the recovery procedure. After confirming the action, your cell phone will be updated and will work normally.

Using another computer
The last hope for the desperate owner of a damaged smartphone is to try to restore the device by connecting it to another PC. Before doing this, you need to make sure that the system has the latest version of iTunes and is installed on Windows computer has a license. By connecting your smartphone to your computer, via USB port do an iOS restore if possible. Things are very bad if even this method did not help.
Most likely, you will have to take the device to a service center, where it can either be replaced under warranty or the fault can be identified and repaired. 90% that the problem is in the memory chip responsible for storing iOS files.

Conclusion
Having tried all the methods described above, repair and restore the operating room Apple systems gadget, you will 100% determine that in case of failure it is not the fault software part, but a mechanical one, in which, most likely, it will simply not be possible to change the firmware. To make your task easier, contact a specialist who will certainly be able to help you.
Video
Sometimes, unfortunately, it happens that iPhone Apple Something bad happens: the touchscreen doesn’t respond, the screen goes dark, the device is locked, I can’t remember the password, an error message appears, and whatever else can happen with your favorite smartphone.
Perhaps you updated the iOS firmware of your iPhone, but it didn’t take root, or you jailbroken unsuccessfully, so the device was blocked. There are many reasons for this, as well as solutions to these problems. In this article we will look at the question: how to restore an iPhone to factory settings.
You shouldn’t worry too much about this, because after reading this article you can restore your iPhone yourself and without outside help, using a convenient and a simple program iTunes on your computer. This process will not take you much time, but will require constant high-speed Internet access on the network.
Please note that, unfortunately, when using this method recovery, all your data on your iPhone will be erased: contacts, photos, documents, music and other information. So check to see if you started it account on iCloud and synchronized the iPhone, or previously synchronized data with iTunes, a backup copy was saved somewhere. Then after restoring your iPhone, you will be able to restore all data from the backup.
Not every firmware version will be compatible with your iPhone; you need to know their compatibility before restoring your smartphone. For example, you can restore the previous version, but it will be outdated and it is advisable to install a newer version. For example, when restoring an iPhone 3G, it is good to use iOS version 4.2.1 while restoring iPhone 3GS , it would be nice to download the iOS 6 firmware. In turn, for iPhone 4 you can also install versions from iOS 4 and up to version 6, and the iPhone 4S no longer supports firmware rollback, so if you do a restore, then only to the latest firmware - from iOS 7.1 to iOS 9.3.5. For iPhone 5S is suitable for firmware version 8, 9 and 10, as for iPhone 6.

Please note that you may not be able to roll back to older versions due to the fact that Apple has stopped subscribing to older builds. You can find out in detail which firmware version is suitable for your iPhone by going to the official website, or by checking service center or special services. If the firmwares are marked with a check mark, then their recovery is still possible, if the iOS ones are marked with a cross, then they will not be restored. On some sites it is possible to download the firmware yourself if you are sure of the version you choose.
What you need to do before restoring your iPhone
As mentioned earlier, to restore an iPhone you will need a computer on which iTunes is installed, the latest version, and if it is outdated, then update it on your PC. This will not take much time, but is very important for the proper process of resuscitating the smartphone.
Next, create a backup copy of iPhone, if possible. To do this, through the “Settings” menu, open the iCloud program and click the “Create” button backup copy on iPhone." You can also back up your iPhone data in iTunes settings. If you don't have a PC, you can erase all data from your iPhone and restore it to factory settings without using a computer.

Make sure that the iPhone is charged at least 70% and is not discharged during recovery, as failure of the program can lead to system error and create new problems.
How to restore iPhone from iTunes
Open the updated version of iTunes on your PC and USB help cord connect the iPhone to the computer. If your iPhone is password-protected and your PC requires you to dial an access code, but you don’t remember the password, then proceed further according to the written pop-up instructions.
Open iTunes will display the connected iPhone. Next, click the “Browse” button, which is located on the tab, select the required firmware and set the “Restore” command, duplicating it in case of a confirmation request. The recovery program will start and take some time, finishing its cleaning work by restarting the device. Now set up your smartphone by clicking on the “Set up as new” command so that it starts restoring in the settings.

How to restore iPhone with error 3194
The reason for the error message number 3194 appearing on your iPhone can mean different things, but as a rule, this error occurs when the “TinyUmbrella” utility or something like it crashed when restoring the iPhone. You can fix this error as follows.
Logging in with hard drive By following the link “C:\Windows\System32\Drivers\etc”, you can find the file element “hosts”. Open it through Notepad and delete the line “gs.apple.com”, then save the file and restart the device’s PC.

Now it will not appear in iTunes this error 3194 during the iPhone recovery procedure, but to be sure, it is better to disable the PC firewall before starting the recovery. When your iPhone 6 is restored, you can reinstall the backup of your saved data from iTunes, as well as set a new lock password.
Unsuccessful firmware or jailbreak of the device can lead to malfunction. In this case, there is no need to despair; you just need to restore your iPhone using iTunes. The procedure is simple and takes little time, however, you need to know some features, which we will discuss in this instruction.
Determine which version of iOS you can restore to
Before you begin restoring your iPhone, you must determine which version of iOS is suitable for the device. The fact is that when releasing new versions of iOS, Apple stops signing old builds. Restoring and rolling back to them, accordingly, becomes impossible.
 The easiest way to determine which version of iOS you can restore to is using this service. Follow the link and select your iPhone (or other mobile device Apple). Firmware marked with checkmarks can be restored. It will not be possible to restore iOS builds marked with crosses. On the same site you can download the firmware itself, which is necessary to carry out the recovery.
Step 1: Download latest version iTunes from the official website or update already installed program. On Mac, you can check for updates in Mac App Store, on Windows in the menu " Reference» → « Updates».
Step 2. Download the firmware version you need. You can download using this service.

Step 3: Connect your iPhone to your computer and enter it into recovery mode. To do this, simultaneously hold down the buttons Nutrition And Home for 10 seconds, then release the button Nutrition, continuing to hold Home for 6-9 seconds. If you did everything correctly, iTunes will launch with a message that the iPhone was found in recovery mode.
Note: Putting iPhone 7 and iPhone 7 Plus into recovery mode is slightly different. Instead of the Home button, you should hold the Volume Down button.
Step 4. Hold down the Shift key on your keyboard and while holding it click on the “ Restore" In the window that opens, select the previously downloaded firmware file.

Step 5: Confirm that the recovery will begin.

Step 6. The recovery process will start and after it is completed, the device will work normally.
During the recovery process there may be various errors, let's look at some of them.
How to fix error 3194 when restoring iPhone
Error number 3194 can occur for various reasons, but the main one is the consequences of working with the TinyUmbrella or similar utility.
In order to get rid of error 3194 when restoring an iPhone, you need to do the following:
- Open the folder C:\Windows\System32\Drivers\etc and find the file in it hosts.
- Open the file with standard program « Notebook" and find the line containing the inscription gs.apple.com- delete this line.
- Save the file and restart your computer.

There is a high probability that error 3194 will not occur the next time you try to restore your iPhone. But for greater confidence, before starting the procedure, temporarily disable your computer's firewall - the chances of a successful recovery will increase significantly.

How to fix errors 1013, 1014 or 1015 when restoring iPhone
These errors occur when you try to downgrade the firmware due to the inability to downgrade the modem version. Important − the method will only help in the case of old iPhone models(iPhone 4s and older).
In order to get rid of errors 1013, 1014 or 1015 during iPhone recovery, you need to do the following:
- Download the latest version of the redsn0w utility.
- Unzip the downloaded file and run the application as administrator.
- Connect your iPhone to your computer.
- On the redsn0w start screen, click Extras → Recovery Fix.

- Click Next and enter the device into DFU mode according to the program instructions. This is easy to do: hold down the button for three seconds Nutrition, then without letting go Nutrition start holding the button Home for 10 seconds, then release Nutrition, but continue to hold the button Home about 10 seconds. Redsn0w will show a timer for each step, so the chances of making a mistake when putting the device into DFU mode will be greatly reduced.

List of famous iTunes errors and ways to solve them can also be found on our website by following this link.
This instruction applies not only to iPhone, but also to iPad and iPod touch. The main thing is to follow all the points exactly, after making sure that all precautionary rules are followed.