Mail backup. Terminal command to backup Thunderbird address book? Thunderbird backup
The article details how to create backup copy Thunderbird data and restore Thunderbird data from backup. How to recover a lost Thunderbird profile and find a lost address Email in the INBOX file, etc. Thunderbird is free, fast, secure and easy to use cross-platform mail client from Mozilla.
It is very popular among users; in the Thunderbird profile it is collected large volume data that may be lost in the event of a program failure, virus activity or computer failure, as well as trivial Windows reinstallation. How not to lose or restore profile data if lost? Mozilla Thunderbird?
Content:Thunderbird Profile Files
In the profile, Mozilla Thunderbird saves all client user settings, as well as passwords, address books, extensions and, in its own words, the files themselves emails. Unlike other email clients (such as Outlook), Thunderbird does not save all profile information in one file. This is a folder with a specific set of files and folders responsible for the operation of the email client and saving its data.
The Thunderbird profile is created during the first launch of the program and is saved by default in the folder:
C:\Users\ Username\AppData\Roaming\Thunderbird\Profiles
In our case, the folder with profile files is named q246yl6l.default, Where "q246yl6l" is an arbitrary set of characters generated by the program itself.
A Thunderbird user profile consists of a specific list of files and folders, such as:
- abook.mab/history.mab– files that contain the address book of the mail client;
- cert8.db/key3.db/secmod.db– database files of certificates and certificate keys;
- localstore.rdf– a file of the location and size of windows that are defined by the user;
- mailViews.dat– file of message viewing modes;
- panacea.dat– a mail folder cache file that displays the mail client folder tree;
- prefs.js– Mozills Thunderbird main configuration file;
and others.

In addition to these files, the profile folder contains a certain set of folders, among which two can be distinguished:
Mail– the folder in which POP3 mail accounts are stored by default, with the files for each account stored in a separate subdirectory.
ImapMail– the folder in which IMAP mail accounts are stored by default. Each account's files are also stored in a separate subdirectory here.
It is in these two folders that all user correspondence, incoming and outgoing messages are stored. Moreover, each mailbox folder has a separate *.msf file, with the same name, which has this folder in the email client itself and in your online email box.

Backing up your Thunderbird data
Mozilla Thunderbird does not have built-in tools for creating a backup copy of user profile data or correspondence files. Therefore, if it is necessary to transfer the user profile to another computer or the computer or operating system fails for some reason, there are two options - use a third-party software or creating a profile backup manually.
For this:

How to restore Thunderbird data from backup
For this:

To make it easier to restore a backup copy of your Mozilla Thunderbird profile in case of loss, it is recommended to create an archive file (.zip or .rar) from a copy of the profile folder. In this case, restoring the profile will be reduced to restoring a single file, and not a folder with files. In particularly complex cases of data loss, after a complete analysis, the user will be able to search for it among those detected by the data recovery program by file name.

How to change where profile data is stored (profiles.ini file)
If you need to move your Thunderbird profile to another location or use a profile that is located in another folder or on another computer drive (for example, a previously created backup copy of the profile), then this is also feasible.
The path for storing Mozilla Thunderbird profile files is specified in the profiles.ini file, which is located in the folder:
C:\Users\ Username\AppData\Roaming\Thunderbird

To change the profile location, open with text editor file profiles.ini and specify in it the new path to the Thunderbird profile folder. The path to the profile is indicated in the line Path=. After changing the path to the profile storage location, also change the value in the line IsRelative=1 on IsRelative=0. Save and close the file profiles.ini and then launch Thunderbird.
File profiles.ini with default data:

File profiles.ini with changes made to the location of the profile:

As mentioned above, all user correspondence is stored in encrypted form in files with the same names as mailbox folders. Such files are stored in the profile folder in subdirectories called Mail and ImapMail.
All information in such files is encrypted by the email client. But the addresses of mailboxes (email) to which messages were sent or received are not encrypted.
Therefore, if for some reason the user has irretrievably lost access to his Thunderbird profile, then opening it using a text editor required file mailbox folders, you can find and restore the necessary emails in it.
For example, if you need to recover email addresses ending in “…@site” from the INBOX folder, then just enter “site” in the text editor’s search and it will display all detected addresses with that ending.

How to transfer mozilla thunderbird to another computer. Last time I told you how to transfer Firefox. Today we’ll look at transferring the Thunderbird email client, with all the settings, from Windows to Linux. Although this option is universal and, by analogy, you can transfer mail with all settings between any systems.
Copying Thunderbird profile from windows
For this post, I created a test mailbox on Yandex and will show everything using it. We will transfer the thunderbird profile with all settings, addresses and letters. First you need to copy your current profile. On Windows it is located here by default:
C:/Users(users)/User(username)/AppData/Roaming/Thunderbird/Profiles/oyxt8jon.default
Instead of - "oyxt8jon.default" there will be the name of your profile, the numbers and letters will be different. If you don't remember where the fundbird is installed. Here, just like forefox, you can see in which folder the thunderbird profile is located. Click the settings button. Hover your cursor over Help. From context menu select Troubleshooting Information.

A page will be displayed containing a lot of information. But we are interested in the "Application Information" section. Find the "Profile Folder" column and click the button called "Show Folder".

The profile folder will open. You need to copy this folder completely. For convenience, you can create an archive. Then copy this folder, for example, to a flash drive. And copy it to any convenient folder on your computer where you transfer your mail. Close the program before copying.
Transferring the Thunderbird profile to Icedove on Debian
How to install icedove on Debian. She is a complete analogue of the Funderbird. Therefore, I will not repeat myself. So. I copy the archive file to my user’s home directory and unzip it. Now open the Icedove program folder. It is located in the home folder and is hidden. Open file manager nautilus. To display it, press the key combination “Ctrl+h” or on the control panel, click the down arrow button and check the “Show hidden files” option.

The folder is located at this path:
Home directory/.icedove/md9m3wcw.default (profile name)
Your profile name will, of course, be different. Open it and delete all contents. Then open the folder that we are transferring from windows and copy its contents to the icedove profile directory in Debian. If the program was in Russian, then Russification may fail. In this case, reinstall the icedove Russification package.
Yes, first of all, you need it, my dear readers!
Saving valuable and important emails
Firstly, you can at any time lose an important message that was sent to you through some Gmail or Yahoo service. And it’s also good if a private message from your beloved Mnemosyne Amphiktyonna is lost. (Or, on the contrary, from Evsei Lukich - here someone is lucky in life). What if, God forbid, you lose a letter from the tax office? This is already a scandal! And Mnemosyne, let’s be honest, might get angry if you suddenly took her precious letters and rubbed them. These are the kinds of troubles that email backup saves you from.
Secondly, there are situations in life when you simply desperately need to move to another email account, or even to a server. As the well-known folk wisdom says, one move is worse than two fires, and you will probably lose something, and, according to the law of meanness, the most important and necessary letters, which seem to be impossible to return from the old account.
Then, for example, a Yandex mail backup can really help you out. This is especially important for business; for example, copying the entire Exchange Server when “moving” to new version or new server equipment will save the entire history of your business relationships.
Archiving information and providing secure access to third parties
Well, don’t forget about your biographers in the future! Instead of trying to understand your subtle personality using a screenshot from some messenger containing seven emoticons and an important message “I LOVE YOU,” they will suddenly be able to rummage to their hearts’ content in a whole mountain of messages written by you (experience teaches that mail.ru backup is in this in a sense, this is a particularly revealing activity - it is on this mail server that for some reason people demonstrate the greatest frankness in expressing their true feelings).
In addition, you can always make a copy of the correspondence and send it to some third party for processing (Handy Backup saves a backup copy of mail in a readable original text format), without worrying at all about providing this person with access to your current account. Information Security- in all fields!
You see how many advantages a mail backup has! Now let's talk about how to properly implement this backup.
Backup email with Handy Backup
If you have Handy Backup, you have everything you need to back up your mail the way you love. If you don't have Handy Backup, then make sure you have it. Otherwise, all conversations are useless. Doing email backup manually is a pointless waste of time, and writing scripts for email backup is the way for Jedi and ninjas, who come to this blog offensively rarely, as they are busy with self-improvement and meditation. All necessary tools for email backup are available in any commercial Handy Backup solution, starting with the lowest Standard version. So please download and install any solution you like, and I will show you how to use it to create a mail backup without any extra effort!
Method one. Mail backup via local mail client
If mail is downloaded by a client program to the local machine (for example, using the POP3 protocol), then to backup mail you can easily and simply use the standard Computer plugin, designed for backing up files and folders. Let's look at this problem using Thunderbird as an example. To make a backup of Thunderbird mail from Windows, open the Computer plugin in Step 2 and look for the following folder:
C:\Users\\AppData\Roaming\Thun derbird\Profiles\xxxxxxxx. \
Here is your name; is the name of your Thunderbird profile, and “xxxxxxxxxx” is some completely random eight digits generated by a computer to make your entries even more unique. Check this folder in the data selection dialog. Whoosh! Your information from Thunderbird will magically move to the storage you choose in the next step, as a backup of your mail and settings! Of course, you can do the same with any other client, but then the folder address and the names of the files stored in it, of course, will also be different.
Method two. Backup email using IMAP protocol
If you are not going to download anything anywhere, but want to take mail directly from the server, then the E-mail plugin is at your service. This plugin simply downloads and downloads your email backup directly from the server. Nothing extra. Only server and storage. However, backing up mail using IMAP and the E-mail plugin is not only a way to demonstrate asceticism and disregard for conventions, but also the most effective tool for transferring data from folder to folder and from account to account.
To use this method, find and open the E-mail plugin in the Email group in Step 2. Create a configuration to access the mail account you need. Then select the folders to download the mail backup from the server and mark them with checkboxes. Again: wow! Mail backup via IMAP will be performed automatically, taking into account all the conditions you specified when creating the task: encryption, scheduling, versioning, etc.
Special plugins for mail backup
In the Email data sources group, in addition to the Email plugin, you will find separate tools for and for copying Exchange Server. This is done in order not to force users to strain themselves when they are going to organize a backup of mail from these very frequently used applications. It is easy to note that the Outlook plugin is designed to work on the email client side and, as a result, is included in all editions of Handy Backup, but the MS Exchange plugin, on the contrary, is part of the server software.
Key features of mail backup with Handy Backup
Using Handy Backup, you can solve many problems related to the proper organization of email backup in one fell swoop. For example, to store a mail backup, you can use either a local disk (some other third-party utilities offer this, as well as built-in tools of individual mail clients), or various other media: network drives, USB drives, FTP servers, various clouds (OneDrive, Dropbox, Google and Yandex Disks, backup to the Mail.ru cloud or other services that support WebDAV, several more storage options). For the most demanding users, Handy Backup also offers its own secure data storage, HBDrive, physically located in San Diego and providing everything needed to store an email backup at the highest level! This storage unit successfully combines the best properties cloud services and secure FTP servers.
Another advantage of Handy Backup is the ability to organize the receipt and storage of a backup copy of mail using exactly the method that will be most convenient for you. You can use partial mail backups (incremental, differential, or mixed full-differential) to reduce uptime and save storage space. You can store multiple versions of the same set of data at the same time, and version folders can be marked with easy-to-read timestamps with the date and time a specific mail backup was created. You can encrypt and compress data for backup directly from the program. And if you want to use Handy Backup in conjunction with other programs (for example, launch an email client every time before backing up mail via POP3), then the possibilities are at your service automatic execution command line before and after the mail backup task.
The task schedule is a separate story. With Handy Backup you can forget about external schedulers and cumbersome scripts for mail backup, and instead set it up once exact time to run a task on a schedule and, if necessary, the period with which this task is repeated - from one minute to several months (within a year). Alternative option— launching a task when a certain system event occurs (for example, when a user logs in or connects to a computer USB devices, previously specified as the destination storage in the email backup task). And, of course, you can perform any task manually at any time.
Handy Backup Solutions
At your service is a whole range of solutions for mail backup - the simplest Standard, the choice of experts Professional, a program for maintaining small business servers Small Server, as well as network solutions - Network for offices and home networks and Server Network for networks of any level. Handy Backup supports all modern Windows versions- 10, 8.1, 8, 7 and Vista, as well Windows Server 2016, 2012R2/2012 and 2008R2/2008. If you are a user Ubuntu Linux or Ubuntu-based distributions of this OS - at your service is a repository with the Linux version of Handy Backup, as well as Linux-based Network Agents for use within network solutions.
Interested and want to try email backup with Handy Backup? No problem, download the distribution from the site and use it full version programs for 30 days completely free! And if you want to learn more about this solution for mail backup, then check the product website www.handybackup.ru more often for news, updates and just read articles about backup. Don't hesitate, they are waiting for you there!
Ensures the security of Thunderbird emails on the local machine, and also helps to transfer and clone data. Handy Backup can create and restore backups for Thunderbird using various information storage facilities.
Benefits of automatically creating a Thunderbird backup
![]()
Automation of all actions
Once a task is created, all subsequent actions (backup, Thunderbird archiving, cloning, etc.) are performed according to the specified schedule or when an event occurs related to the scheduled launch of the task.
Choosing Thunderbird backup methods and tools
For Thunderbird, a backup can be created using various algorithms ( local access to folders in which Thunderbird stores mail, incremental backup, storing multiple backup versions, encryption, etc.).
Effective recovery
Handy Backup allows you to organize mail recovery for Thunderbird, cloning or moving mailboxes, or simply viewing unencrypted messages in storage using a previously created backup copy of messages (Thunderbird backup).
Other Handy Backup features
In addition to the advantages described above, Handy Backup contains a wide variety of tools and plugins to improve efficiency and ease of use, including Mozilla Thunderbird backup. Features that deserve special mention include:
- Thunderbird Mail Archiving
Compress your Thunderbird messages into ZIP archives to reduce the time it takes to transfer data over the network and the amount it takes up on storage devices. This feature is built into Handy Backup tools. - Safety
You can encrypt your backups using a built-in algorithm, select secure data storage, or create a password-protected archive to restrict access to your mailbox backups. - Secure storage
Use local and network drives, NAS devices, FTP/SFTP/FTPS servers to backup Thunderbird, cloud storage(for example, backup to Yandex.Disk), as well as special storage HBDrive. - Direct access to the mail server via IMAP
In addition to Thunderbird backup, Handy Backup can use the built-in "E-mail" plugin to create a mail backup, backup and restore emails directly from the mail server.
How to Backup Thunderbird to Handy Backup
To back up your mail in Thunderbird, please follow these steps.
- Using the Thunderbird settings panel, look at the paths to your local folders with mail, addresses, profiles, etc. Copy or memorize these paths.
- Open Handy Backup. Using the Ctrl+N keys or the button on the main panel, create a new task. Select the task type - backup - in Step 1.
- In Step 2, open the Computer plugin in the list of local drives. You will see the drive and directory structure of this computer. Select the Thunderbird folders you found.

- Check the folders you found. (You can also use the File Filters feature to select the data you want by name.) Click OK.
- Your data is included in the backup list; continue creating the task as described in the User Guide.
To restore mail from an archive (Mozilla Thunderbird backup), create a data recovery task and select the storage location with the Mozilla Thunderbird backup in Step 2. Next, find the file in the backup directory backup.hbi and select it; it contains recovery data.

Advice: You can change the data recovery location by creating a copy or clone of your Mozilla Thunderbird mail from a backup. To do this, click "Change Location" in the recovery dialog, then select a new location for the Thunderbird emails to be recovered.
Back up your Thunderbird mail with Handy Backup - convenient, reliable and simple solution for backup of any data!
The Mozilla Thunderbird email program makes working with correspondence and newsgroups much easier if you configure it correctly. The procedure is simple and will not take much time from the user, but will help optimize the workflow in the future. From this instruction you will learn how to customize Mozilla Thunderbird as efficiently as possible in order to use the full potential of this tool.
What is a Mozilla Thunderbird profile
Profile – information that is generated during the operation of the mail client, but does not relate to the executable files of the program:
- local mail and copies of Email messages (depending on settings);
- custom settings (themes, toolbars, etc.).
By default, Mozilla Thunderbird creates a profile called default immediately after installation. It will also be used by the program in the future, unless you specifically create a new one using the Profile Manager.
Where is it stored
When creating a profile, a name like xxx.yyy is assigned, where xxx is 8 numbers randomly generated by the program, and yyy is its display name. IN different versions OS location of profile files is different. To quickly find a profile,
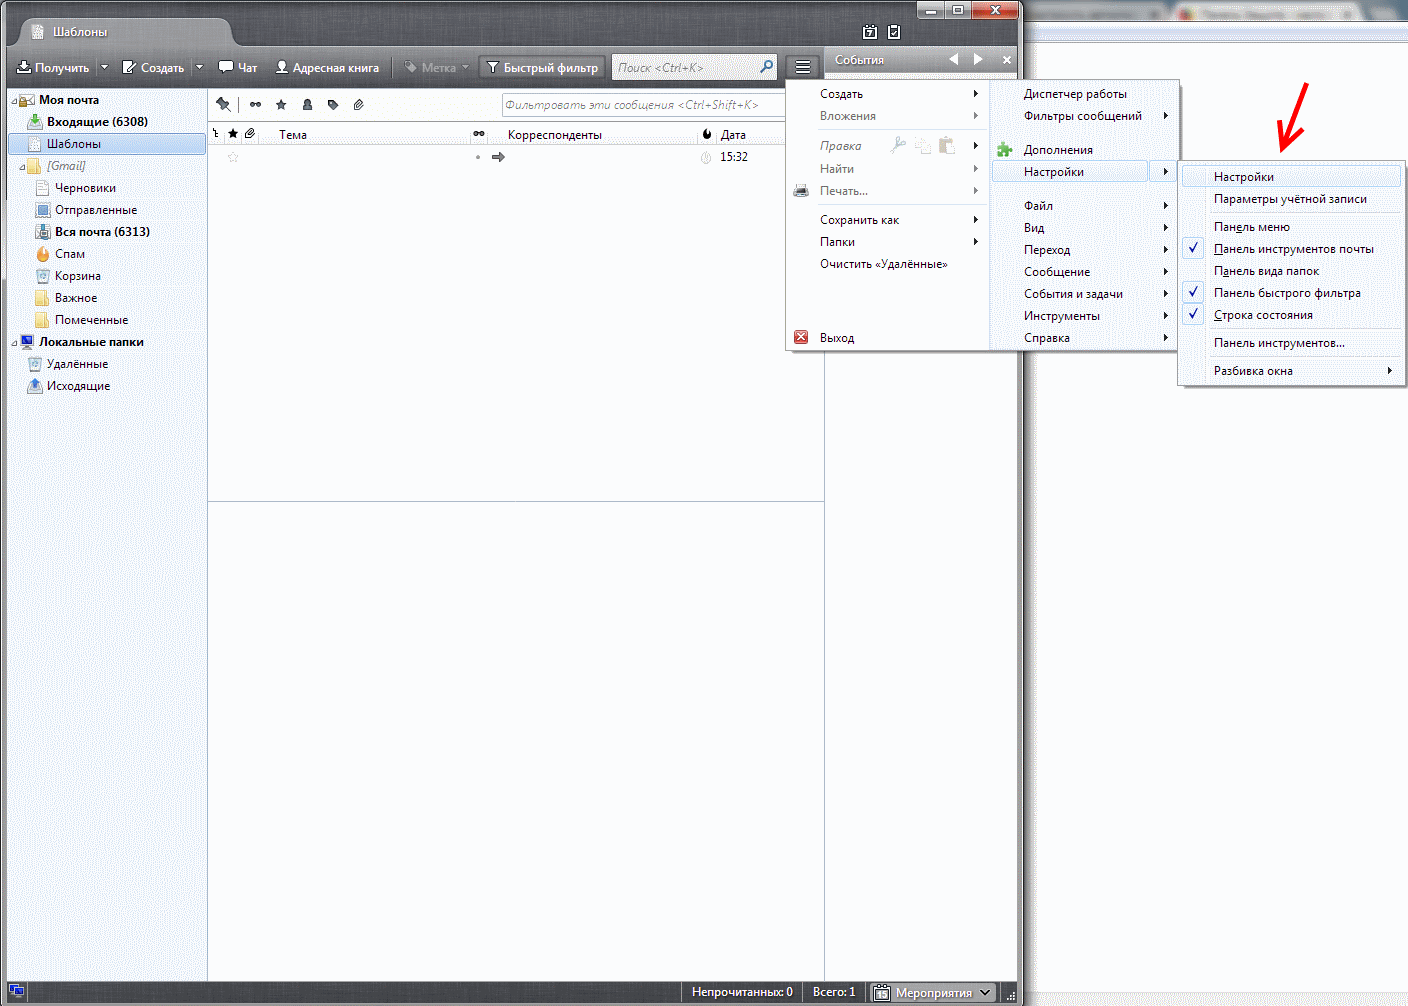
You should click on the main menu button of the program and follow the path “Help” - “Information for solving problems”. Opposite the “Profile Folder” item there is a “Open Folder” button. By clicking on it, you will be taken to the target directory, where you will see the required files.


Profile backup and restore
To create a backup of Mozilla Thunderbird profile files, you should follow a simple algorithm:
- close the program;
- open the directory with profile files using the method indicated above;
- go to a higher level and copy the profile folder named xxx.yyy;
- save the directory to the target location on disk.
You can store a backup copy both on your computer’s hard drive and external media – optical disks, flash drives, file sharing services and cloud servers.
To restore a Mozilla Thunderbird profile, simply copy the folder to the target directory and replace the files. If the procedure is carried out after reinstalling the OS and the default profile is given a different name after reinstalling the program, you should not copy the folder, but only the files contained in it.
Mozilla Thunderbird Account
During the Mozilla Thunderbird setup process, most settings are set to automatic mode. Manual settings are required only in cases where the Email provider is not included in the program’s automatic configuration databases or non-standard email account parameters are used.
Automatic settings
All that is required from the user in this case is an email address, an account password and a username. All other parameters are security protocols, domain names and ports used, Mozilla Thunderbird will download from the server from the configuration database.
The configuration proposal is issued by the program during the first launch after its installation. If the user for any reason missed this step, the Mozilla Thunderbird mail setup can be called up at any time through the main menu (“Create” - “Receive” new entry mail").

In the dialog box that appears, Mozilla Thunderbird will prompt you to create a new mailbox. You can refuse this by clicking the appropriate button.

In the next window, you must fill in the fields provided and click the “Continue” button.

All that remains to be done is to select the appropriate protocol (IMAP or POP3) and click the “Finish” button.

The program will redirect the request to mail server(in this particular case, it shows how to set up Mozilla Thunderbird for Gmail), where you should log in and give it access to your account.


If the correct data is entered and everything is done correctly, the mail client will connect to your account and download all correspondence.
Note! In the case of Gmail, letters and notifications are not sorted by category (Social Networks and Promotions), as when entering the mailbox through a browser. In Mozilla Thunderbird they are presented in the form of a list, which is not always convenient to use.

Changing the account protocol
Another aspect that you should know about how to set up Mozilla Thunderbird mail concerns the transition of an account from POP3 to IMAP. POP3, as an older protocol, is no longer used almost anywhere, and all major email providers have long ago switched their servers to IMAP.
If your provider does not support IMAP, but you want to take advantage of all the benefits of this protocol, it is recommended to change your service provider and set up forwarding of correspondence from the old mailbox to the new one.
It is enough to create a new IMAP account, moving all the necessary correspondence from the old one:
- Disable POP3 account. Click right click Click on the account name on the right side of the window and select “Settings” - “Server Settings”. Here you need to uncheck the “Check for new messages every XX minutes” and “Check mail on startup” checkboxes.
- Create a new account using the method described above;
- Drag the necessary letters from the POP3 account to IMAP to upload them to the server;
- Delete an old entry - click on the “Actions” button in the parameters window and select the appropriate item.

Themes and design
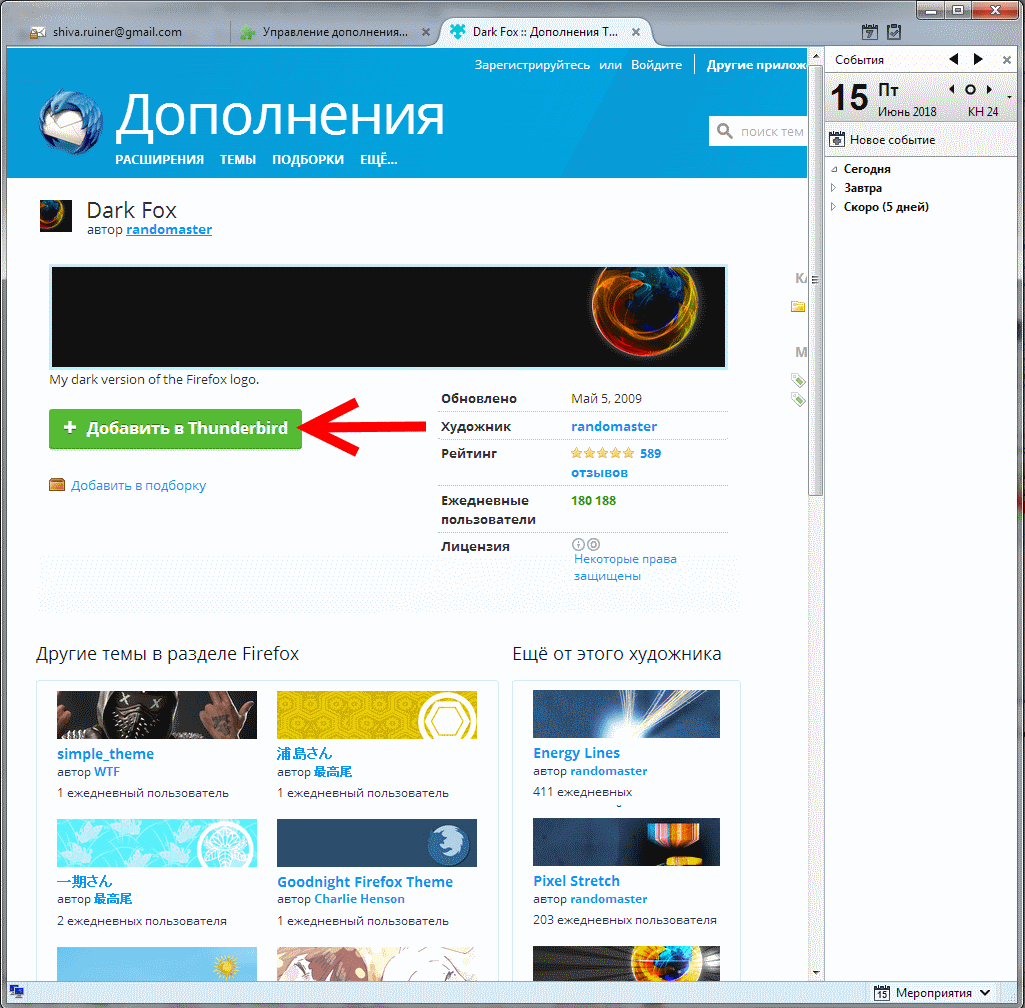
In Mozilla Thunderbird, themes are presented as separate themes that must be downloaded from the Internet. This can be done without visiting third-party resources right in the program window. To do this, click on the “Add-ons” item in the main window.

Scroll down the contents of the “Get Add-ons” tab and opposite the “Favorite Topics” item, click on the “Show All” link.”

Having found a suitable theme, click on its name and on the next page click the “Add to Thunderbird” button. Don't forget to also click the "Allow" button in the pop-up window.
The downloaded theme is applied automatically. If you have downloaded several themes, to switch between them you need to go to the “ Appearance» add-on management menu and click the “Enable” button next to the name of the theme you want to apply.

In the same menu, you can remove Mozilla Thunderbird themes that you no longer like.
Sorting letters
In Mozilla Thunderbird, you can install one or more filters to automate actions with received or sent correspondence. Filters work in the order in which they are located in the user's list. To create a new filter, go to the main menu of the program and select “Message Filters”. In the window that opens, you need to select the account to which the filter will be applied and click the “Create” button.

The filter settings menu will open. All key filtering parameters are set by selecting the appropriate option from the drop-down list.

Using this tool, for example, you can filter out spam by a specific word in the body of a letter or set up saving correspondence from a specific counterparty in a separate folder.
How to auto-reply in Mozilla Thunderbird
This feature will be needed if you are on vacation or absent for several days. You can configure it using a simple algorithm:
- Create a new message by pressing Ctrl+N
- Indicate in the body of the letter “Absent from ... to ....” There is no need to specify a recipient.
- In the message creation window menu, select “File” - “Save As” - “Template” and close the current window.
- Create a new filter using the method described above.
- In the filter parameters, move the switch to the “Without any conditions” position and assign the action “Reply using a template”.
- Confirm the changes by clicking the "OK" button.

Setting up an answering machine in this way is easier and faster than setting parameters for each connected mailbox. The main thing is to remember to turn off or remove the filter when you return from vacation.
In Mozilla Thunderbird, the Mail setting allows you to configure a template response not only for all incoming letters, but also, for example, for specific counterparties or by keywords.
Protection and anti-spam
Setting up filtering for unwanted or fraudulent mail in this program is much easier than filters. To do this, go to the “Settings” item through the main menu.
The following actions are available in the “Protection” tab:
- For antispam. Delete or move spam to the appropriate folder, mark as read. An adaptive learning filter is provided that sorts subsequent correspondence based on user actions.
- For fraudulent emails. Inform whether incoming message suspicious.
- For antivirus. Allow antivirus software to quarantine suspicious attachments.
- For passwords. Remember passwords for all accounts and set a master password.

Sound settings
Sound notification settings can be found through the main menu in the settings in the “General” tab. To signal the receipt of mail can be used as standard accompaniment from sound circuit operating system and an audio file stored on the computer's hard drive. If the function is not needed, it can be disabled by unchecking the corresponding box.

Setting up template responses
IN email correspondence It is considered good form to include all contact information at the end of the letter so that the recipient can contact the sender in any convenient way. To avoid entering this data manually each time or copying it from text file, you can create a ready-made template based on which to generate new outgoing messages.
The first step is to make the signature itself. To do this, create a new message using the Ctrl+N key combination and type (or copy) contact information. Then, in the message creation window, select “File” - “Save As” - “File”, select a storage location on your computer and set a name.
Then in your account settings you need to find the “Insert signature from file” option, check the box and set the path to the saved file.

The signature text can also be placed in the appropriate field in the account settings. In addition, you can attach a business card - for example, an image, animation or short video.
Configuring server settings
To edit these values, you need to right-click on the account name, select Settings and in the window that opens, go to the “Server Settings” tab.

Here it is recommended to adjust the mail checking interval and actions with deleted letters, but do not change the key parameters of the program - the port used, security and authentication methods, since incorrect settings may cause problems with Mozilla Thunderbird.
Export Mozilla Thunderbird and account settings
Since the program is cross-platform, all work data can be moved between different operating systems– for example, Windows and Linux in any direction. The account also belongs to this data, therefore it is stored in the same place as all other profile files (where exactly, see above). Export account Mozilla entries Thunderbird is similar to transferring settings: just copy these files to the target computer. You can use not only physical drives, but also move them using remote access– for example, using Team Viewer or Radmin.
Program settings for different email services
Parameters required for correct work with by Gmail, shown in the example above. It's convenient that Mozilla setup Thunderbird for Mail ru or Yandex is no different: these popular providers have been using the IMAP protocol for a long time, so the configuration is loaded by the application automatically.