What is a Word program? Creating a new document in Microsoft Word. Document templates. Word as a task manager
Word 2010 is text editor, which allows you to create different types of documents such as letters, documents, flyers, faxes and more. In this lesson you will get acquainted with the main menu ribbon and the new pop-up menu, learn how to create new documents and open existing ones.
Word 2010 is a little different previous versions. The toolbar is the same as in word 2007 and includes the Main Menu Ribbon and the Quick Access Toolbar. Unlike word 2007 commands like "open" And "seal" located in a pop-up menu that replaces a button Microsoft Office.
Ribbon
The new main menu ribbon was first introduced in word 2007 to replace the traditional menu. The ribbon contains everything you need to perform common commands. It contains numerous tabs, each of which contains several groups of commands. You can also add your own tabs that contain your preferred commands. Some groups have an arrow in the lower right corner that allows you to open more teams.
Some programs such as Adobe Acrobat Readers can add a separate tab to the feed. These tabs are called “built-in elements”.
To collapse and expand the ribbon
The ribbon is designed to meet your current needs and be easy to use. However, you can minimize it if it takes up too much screen space.
- Click the arrow in the top right corner of the ribbon to collapse it.
- To expand the ribbon, click the arrow again.

When the ribbon is minimized, you can temporarily bring it up by clicking on any tab. The ribbon will disappear again if you don't use it.
Setting up the main menu ribbon.
You can customize the ribbon by creating your own tabs with any commands. Commands are always located within a group, and you can create as many groups as you like to organize your tabs. If you wish, you can even add commands to any standard tab, creating a custom command.
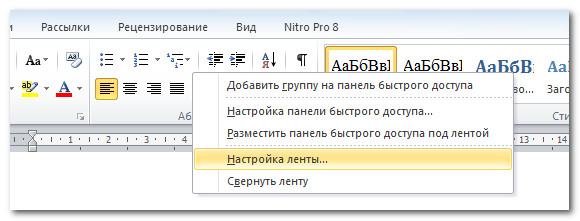
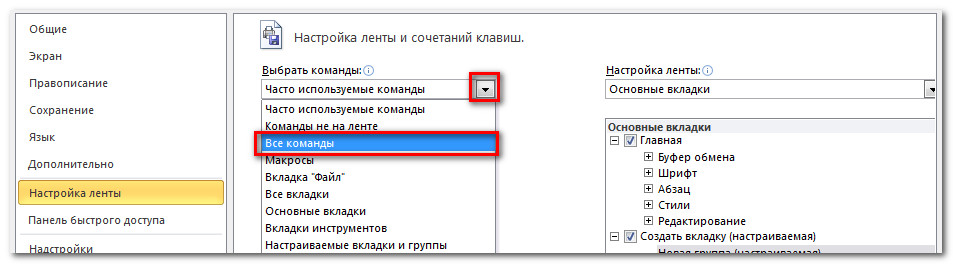
- Click right click mouse over the main menu ribbon and select “Customize Ribbon”. A dialog box will appear.
- Click Create Tab. will appear New inset with a new group.
- Make sure you select a new group.
- Select a command from the list on the left, then select Add. You can also drag commands directly from the group.
- When you're done adding commands, click OK.

If you don't see the command you need, click Select Commands and select All Commands from the menu that appears.
The pop-up menu contains various options with which you can save, create, print and share documents. It is similar to the Word 2007 button menu and the file menu of previous versions. However, unlike a regular menu, it has a full-page layout, making it easy to work with.
To bring up the pop-up menu:
- Click on the File tab.
- The options are on the left side of the page.
- To return to the document, click any tab on the ribbon.

The Quick Access Toolbar sits above the Ribbon and allows you to quickly access standard commands no matter what tab you are on. By default, it shows the Save, Edit, and Redo commands. You can add other commands to make your work more convenient.
To add commands to the Quick Access Toolbar:
- Click the arrow on the right side of the menu
- Select the team you want to add. The command will appear in the quick access menu.

Ruler
The ruler is located at the top and left of the document. It allows you to accurately align your document. Optionally, you can hide the ruler to free up more screen space.

To hide or show the ruler:
- Click the Ruler icon in the scroll bar.
- To show the ruler, click the icon again.

Creating and opening documents
Files in Word are called documents. To get started new project in word, you first need to create a new document, which can be either empty or template. You also need to know how to open an existing document.
To create a new document:
- Click on the file tab. A pop-up menu will open.
- Select create.
- Select a new document from the available templates. It will be highlighted by default.
- Click "create". A new document will appear in the Word window.

To save time, you can create a document from available templates, which you can select in the new document window. We'll talk about templates in the next lessons.
To open an existing document:
- Click on the "File" tab. A pop-up menu will open.
- Select "open". A dialog box will appear.
- Select your document and click open.
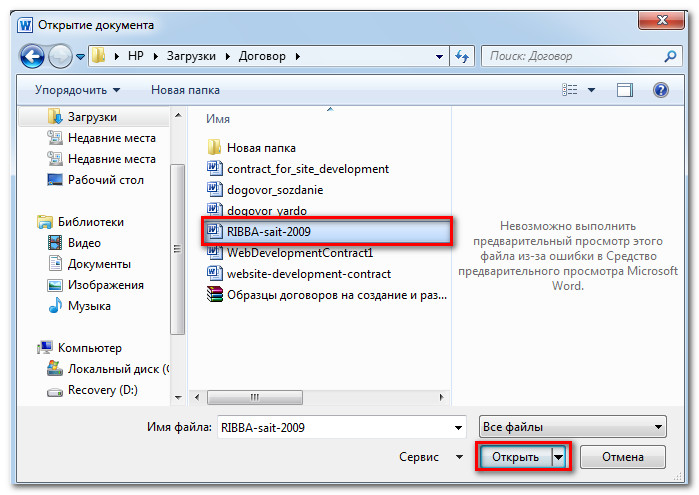
If you have opened a document recently, you can open it from the list Latest documents. Just click on the file tab and select the latest ones.

Compatibility Mode
Sometimes you will need to work with documents that were created in more earlier versions Word programs such as Word 2007 and Word 2003. When you open such documents, they will open in compatibility mode.
Compatibility mode has certain restrictions, so you will only have access to the commands that were in the programs in which they were created. For example, if you open a document created in Word 2007, you can use Word 2007 tabs and commands.
Microsoft Word is a text editor that can be part of Microsoft package Office or a program installed separately on your computer. The program can be used to record letters and various types documents, which may include graphics and images. This guide explains how to open Microsoft Word, launch, create, and save a new document using operating system Windows 7.
Don't be afraid that something might not work out or go wrong. This program was created for users, and it is thought out to the smallest detail to make it as convenient as possible for you to use it. And of course, the main thing in every task is training, don’t be afraid to make mistakes. If you accidentally click the wrong button, there is always a curved arrow in the upper left corner that allows you to undo your last action. You can also do this using the Ctrl and Z key combination.
One last piece of advice before you start detailed instructions for using a Windows text editor - . This is especially important when working with large texts or serious documentation. Anything can happen: the electricity can be cut off, the laptop can discharge and turn off, and no one is immune from breakdowns. Lose important files and then spending hours restoring them is not the most pleasant experience. All you need to do is click on the floppy disk in the upper left corner from time to time.
The program can be found in the Start menu under Microsoft Office. Follow these step by step instructions to launch the document in Microsoft Word.

Program navigation

How to select (highlight) text
Selecting or highlighting text allows you to change the selection in terms of style, font and/or color, and even replace words if necessary. Follow these step-by-step instructions to select text in your document.
Step 1. The mouse is used to select text. The pointer will change as you move it.
Step 2. Move the pointer to the beginning of the desired fragment. Press and hold left button mice. While doing this, move the pointer to where you want to stop the selection. As you move the mouse, the text will be highlighted. When you are finished with your selection, release the left mouse button.

The selected text can now be formatted or modified.
You can copy text using the Ctrl+C keys. Delete text - Backspace.

Changing the size and font
The following steps can help make your writing more interesting and engaging. The text can be changed in different ways.


Text alignment
Sometimes the document you are creating may require a different arrangement of paragraphs. By default, text is aligned left. However, text can be aligned to the right or center.

On a note! Select all text Ctrl + A.

You can change the selected text using a combination of keyboard shortcuts, which is sometimes easier:
- Center - select the text, press Ctrl + E.
- To the right - Ctrl + R.
- Fit width - Ctrl + J.
- Left - Ctrl + L.

How to make text bold, italic, or underline
The ability to change the font style can make your document more interesting. Different text styles, such as bold or italic, can make it stand out. Underlining can be useful for headings.

- bold - Ctrl + B;
- italics - Ctrl + I;
- underline - Ctrl + U.
Copy and paste
There is no need to talk about the importance of these two functions. They save our time significantly and allow us to insert without retyping it, as was the case in the days of typewriters.

This can also be done using hotkeys. Everything is the same as last time: press Ctrl and C at the same time to copy the text, and Ctrl and V to paste.
How to Create a Numbered or Bulleted List
Using numbered or bulleted lists can help highlight elements or show important steps, hierarchy, or sequence of something.

To stop adding new elements and return to standard text, click the numbering icon again at the top of the document.
A bulleted list is created using the same principle, the only difference is 1 step. Instead of the “Numbering” button, click on the “Markers” button, it is located to the right.
There is another way to create a list. First, the user enters all the list items, each one must be new line. When all the items have been typed, select them all and click either on the numbering or on the markers, depending on what kind of list you need.

You will get the same result. This different ways and there is no right or wrong here, the main thing is that the goal is achieved. Use the method that is convenient for you.

They help to structure information and present it in a more comprehensive manner. presentable form. You can't do without this skill.
- Step 1. In the top toolbar, go to the Insert tab.
- Step 2. Click on the table icon. A window will open in front of you in which you need to select the number of cells. This can also be done by entering the numbers manually. To do this, in the panel that appears, click on the “Draw table” area.

All you have to do is fill out the fields. If you suddenly need additional rows or columns, you don't have to redo the whole thing. Left-click in the table area. In the menu that appears, click “Insert” and select the appropriate option.

This basic knowledge should form your basic principles of working with text. Let's highlight the main ones:
- The text is entered where the blinking cursor is located and nowhere else.
- To change a character, word, line, paragraph, or entire text, you first need to select it. It is necessary that the computer understands what exactly it must perform actions on.
- Once you select the text, you can do whatever you want with it. You can practice, select a fragment and alternately click on the buttons located on the “Home” tab. You'll notice which features can be used together and which are mutually exclusive.
- Don't forget to save your changes to protect yourself.
- Use those methods of solving the problem facing you that are convenient for you.
Video - Word for Beginners
Date: May 22, 2017 Category:
Hello, friends. Today we begin to consider working with Microsoft Office Word(I will tell you using version 2013 as an example). If you have already studied Excel on my blog, it will be much easier for you to understand Word, since the management principles in most programs Office package identical.
What is Word and what to use it for
I think everyone knows that Microsoft Word is the most popular text editor that provides wide functionality to your users. And more recently, it began to support “cloud” technologies, which makes it easier to share and make your documents available anywhere there is an Internet connection.
Word workspace
A Word workspace is a document that resembles a piece of paper. It's as if you are sitting at a typewriter and every keystroke is transferred to a sheet of paper. It’s the same here, only the sheet is on your screen. In addition, there are many buttons, icons, tools with which you can make professional text documents without much difficulty.

As for the contents of the Microsoft Word window, it consists of the following elements:
- Title bar– the upper part of the program window, in which the file name is displayed and some controls are located:
- Document's name, located in the center of the screen
- Quick Access Toolbar– located in the upper left corner, contains the most frequently used commands. You can customize the Quick Access Toolbar to your liking;
- Help button
- Ribbon Display Options button. Here you can select the feed display modes;
- Minimize and close buttons current window
- Ribbon– located below the title bar, contains all the main controls:
- Ribbon Tabs– groups of tools combined in accordance with their purpose
- Ribbon– an area with tools for customizing the document and its contents
- Workspace– a space that imitates a sheet of paper. This is where the results of your work are located - text, images, diagrams, etc.
- Status bar– displays supporting information about your document: active page, number of words in the document, spell check language and much more. The contents of the status bar can be customized;
- View mode selection buttons– determine what your work area will look like;
- Scale– slider for setting the scale for the work area
- Scroll bars(horizontal and vertical) – tools for scrolling through content that does not fit entirely on the screen;
- Rulers– help you navigate the layout of the sheet, as well as quickly adjust margins and indents.
In general, everything is organized in the traditions of Microsoft Office, thought out and polished. This workspace layout is unified; once you understand it, you won’t get lost in another product from the Microsoft Office suite.
I'm finishing this short introductory post, and in the next article I will talk about documents in Microsoft Word. Join us!
Microsoft Word is the most important and necessary tool for any office work. And the number of functions it possesses will shock any person. We have selected 20 tips that will help simplify your work with Word and automate some routine tasks. You can check out similar material for Excel.
Inserting date and time
You can quickly insert a date using the key combination Shift + Alt + D. The date will be inserted in the format DD.MM.YY. The same operation can be done over time using the combination Shift + Alt + T.
Quick case change

If you do not yet know touch typing, then CAPS LOCK can play a cruel joke on you. By accidentally turning it on and not looking at the screen, you can type a mountain of text that will have to be deleted and rewritten from scratch because of one pressed button. But by selecting the text you want and pressing Shift + F3, you will change the case from uppercase to lowercase.
Cursor acceleration
Typically, if you move the cursor using the arrows, it moves one letter at a time. To speed up its movement, hold down the Ctrl key together with the arrow.
Selecting text fragments located in different places

Very useful feature, which allows you to highlight inconsistent text fragments. Hold Ctrl and select the pieces of text you need.
Clipboard

If you use copy and paste (and you probably do), then you most likely know about the advanced clipboard in Word. If not, then it is called by clicking on the button of the same name and shows everything that you copied to the buffer while working.
Quickly take screenshots

If you are making a manual, a review of a service, or you just need to insert a screenshot into Word, you can do this very simply using the appropriate tool. Click on the "Snapshot" button and Word will show everything active windows. By clicking on any of them, you will receive a screenshot of this window.
Hyphenation

Including hyphens can improve the readability of your text and also eliminate long empty spaces between words. You can arrange them yourself or entrust it to the computer. The button is located in the “Page Layout” - “Hyphenation” menu.
Watermark

You can add a watermark to your document for added protection. To do this, go to the “Design” menu and select “Background”. Word has four standard templates, or you can create your own.
Repeat previous command
A very useful function that allows you to duplicate the last command. If you press F4, Word will repeat the last command you made. This can be entering text, sequentially deleting several lines, applying styles for different sections of text, and much more.
Setting the accent

Adding emphasis in Word couldn't be easier. To do this, place the cursor after the letter on which the accent should be placed and hold down the combination Alt keys+ 769. Important: numbers must be pressed on the numeric keypad on the right.
Customize the Ribbon

The top ribbon with buttons can be highly customized. To do this, go to the menu “File” - “Options” - “Customize Ribbon”. Here you can add features that were not there before and remove those that are not needed. Moreover, you can delete or create your own tabs with functions.
Quickly select a large piece of text
To quickly select a large piece of text, place the cursor at its beginning and Shift-click at the end of the fragment. It will save time and nerves in situations where you have to select several sheets at once.
Quickly move through a document
There are several combinations that greatly speed up document navigation:
- Ctrl + Alt + Page Down - next page;
- Ctrl + Alt + Page Up - previous page;
- Ctrl + Home - move to the top of the document;
- Ctrl + End - guess for yourself. :)
Inserting a new page
How I hate myself for not knowing this combination before. Ctrl + Enter allows you to instantly create a new sheet, rather than holding Enter with one hand while brewing tea with the other.
Changing the default save folder

By default, Word saves all files in the Documents folder. To change this, go to the menu "File" - "Options" - "Save". In the “Default local file location” line, select the folder you need. In the same menu, you can configure the default document format, autosave, and much more.
Source formatting

In order to return the text to its original formatting, you need to press the Ctrl + Spacebar key combination.
Word as a task manager

If you're a big fan of Microsoft and Word in particular, you can even use it as a task manager. True, first you have to try a little. Right-click on the Features Ribbon at the top and select Customize Ribbon. In the right column, enable the only disabled tab “Developer”.
Go to the “Developer” tab that appears and find the “Checkbox” element, which shows a check mark (why not). Now, by clicking on the checkbox, you can create lists of tasks and mark them as completed.
Vertical text selection

If you accidentally mess up your list, you can highlight the text vertically. To do this, hold Alt and use the mouse cursor to select.
Protect a document with a password

There is no need to even say why this is needed. In our age, when information has become the main weapon, it never hurts to have additional protection. To protect a document with a password, go to the "File" tab and select the "Document Protection" option. Now feel free to create a password, but remember that if you forget it, you will not be able to recover it.
The fastest way to open Word

Rounding out our list is an incredible hacking trick. If you used to open Word by creating a new document or searching for it in the Start menu, that's a thing of the past. Press combination Windows keys+ R and enter in the window that appears winword. If you don't use command line for other commands, the next time you press Windows + R, the command to launch Word will automatically load and all you have to do is press Enter.
Do you have any ways to make Word easier? I'm sure there is. Share them in the comments!