What can be made from a computer mouse. We receive an image from the optical sensor of a computer mouse using Arduino. Open link in new tab
- I’ve had the idea of drawing on a PC for quite some time now, and dabbling in Photoshop and illustrator.
- Yes, there are tablets for this, but I think buying, ala, “try and forget” is an inappropriate solution))
Therefore, it was decided to make from what was at hand...What do we have? That's right - mouse)
We also have a marker that you can try stuffing her insides into.
- As it turned out, not everything is so simple, There are usually more parts in mice than fit into a marker.
- However, if you look, then you can find a SINGLE-CHIP mouse, inside the kit - 2 electrolytes of 47 uF / 10V (one on the power supply, and the second on the button) + a 100nF ceramic capacitor.
- It connects directly from the PC, all buttons also go directly.
- This chip already contains a sensor + controller.
- Size – DIP chip.
1) How does the mouse work?
This is a CAMERA that “photographs” the surface. The information enters the chip, it compares this “snapshot” with the previous one and determines the movement.
- She's just taking off high speed.
- In order for the “camera” to see what it is filming, it is illuminated by an LED (usually red), you CAN install any one (of a different color/size). And power it from anything.
- Light-emitting diode not synchronized, and the change in brightness is done to save energy, protect the matrix (camera) and aesthetics.
- An important point - optics. The meaning is simple - you need the “picture” of the surface to be sharp (otherwise there is no comparison), in general, just like in your favorite soap dish.
2) What do we need in order to repeat?
- Mouse with one chip(Which one is above). Price – 3 dollars. From it we will take a chip, a body kit and a lens.
- Marker (also above). It's for 50 cents))
- Hot melt adhesive.
- LED 3mm (any color)
- The button is not fixed (there is a photo below). It will be analogous to the left mouse button.
- Something for decoration (a pen for design should have a design;))
3) Let's get started:
- Disassemble the mouse (you can even break the case, we don’t need it). Suitable for us like this, it's cheap and single-chip!

- Draw the pinout of the microcircuit ( the picture below is an example). The pinout can be copied from the board.
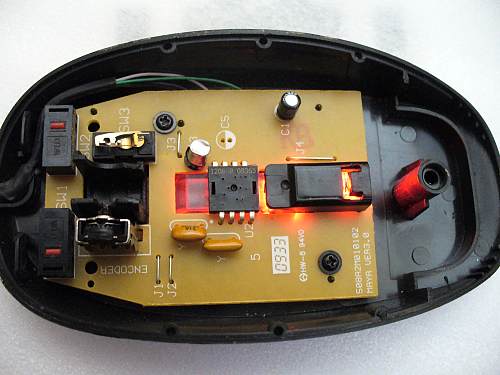
- Cutting down unnecessary part optics and glue the rest with hot glue to the sensor:

- Disassemble the marker. We don't need the upper part.
- Make a hole for the button

- Pull the wire through the marker.
You can take the following buttons, for example:

- Using overhead soldering, assemble the MK + wires + for the button + attachment. Should fit in the marker.
- Fill with hot glue (it’s better to check how it works first)
You'll get something like this)) No drivers are needed, the mouse is still:

To solve one of the problems, I needed to programmatically obtain and process images of a small area of the paper surface from a very close distance. Not getting decent quality when using regular USB cameras and already halfway to the store for an electron microscope, I remembered one of the lectures in which we were told how various devices, including a computer mouse, work.
Preparation and a little theory
In details of the operating principle of modern optical mouse I won’t go into detail, it’s written in great detail (I recommend reading it for general development).After googling information on this topic and disassembling an old PS/2 Logitech mouse, I saw a picture familiar from articles on the Internet.

Not a very complicated design of “first generation mice”, an optical sensor in the center and a PS/2 interface chip slightly higher. The optical sensor I came across is an analogue of the “popular” models ADNS2610/ADNS2620/PAN3101. I think they and their counterparts were mass produced in the same Chinese factory, with different labels on the output. Documentation for it was very easy to find, even along with various code examples.
The documentation says that this sensor receives an image of a surface measuring 18x18 pixels (400cpi resolution) up to 1500 times per second, stores it and, using image comparison algorithms, calculates the offset in X and Y coordinates relative to the previous position.
Implementation
To “communicate with the sensor” I used the popular computing platform Arduino, and decided to solder directly to the legs of the chip.
We connect 5V and GND to the corresponding Arduino outputs, and the sensor legs SDIO and SCLK to digital pins 8 and 9.
To obtain an offset by coordinates, you need to read the value of the chip register at addresses 0x02 (X) and 0x03 (Y), and to dump the picture you need to first write the value 0x2A at address 0x08, and then read it from there 18x18 times. This will be the last “remembered” value of the image brightness matrix from the optical sensor.
You can see how I implemented this on Arduino here: http://pastebin.com/YpRGbzAS (only ~100 lines of code).
And to receive and display the image, a program was written in Processing.
Result
After a little “finishing” of the program for my project, I was able to receive an image directly from the optical sensor and perform all the necessary calculations on it.
You can notice the texture of the surface (paper) and even individual letters on it. It should be noted that such clear picture quality is obtained due to the fact that the developers of this mouse model added a special glass stand to the design with a small lens directly under the sensor.
If you start to lift the mouse above the surface even a couple of millimeters, the clarity immediately disappears.

If you suddenly want to repeat this at home, to find a mouse with a similar sensor, I recommend looking for old devices with a PS/2 interface.
Conclusion
Although the resulting image is not very large, it was quite enough to solve my problem (barcode scanner). It turned out to be very economical and fast (a mouse for ~100 rubles + Arduino + a couple of days to write the code).I will leave links to materials that were very useful to me for solving this problem. It really wasn’t difficult and was done with great pleasure. Now I'm looking for information about chips of more expensive models modern mice for getting high-quality images with higher resolution. I might even be able to build something like a microscope (the image quality from the current sensor is clearly not suitable for this). Thank you for your attention!
Who in childhood did not dream of laser? Some men still dream. Regular laser pointers with low power are no longer relevant for a long time, since their power leaves much to be desired. There are 2 options left: buy an expensive laser or make it at home using improvised materials.
There are the following methods for making a laser yourself:
- From an old or broken DVD drive
- From a computer mouse and flashlight
- From a kit of parts purchased at an electronics store
How to make a laser at home from an old oneDVDdrive
How to make a laser from a computer mouse
The power of a laser made from computer mouse will be much less than the laser power produced by the previous method. The manufacturing procedure is not very different.

- First, find an old or unwanted mouse with a visible laser of any color. Mice with an invisible glow are not suitable for obvious reasons.
- Next, carefully disassemble it. Inside you will notice a laser that will have to be soldered using a soldering iron.
- Now repeat steps 3-5 from the instructions above. The difference between such lasers, we repeat, is only in power.
Nowadays, even from a computer mouse you can make original things. Many fans of fakes have long figured out how to use a non-working mouse.
Should you throw away your old computer mouse?
Sometimes a computer mouse becomes unusable, sometimes you have to replace an outdated model with a more modern one because of convenience. Often in this case appearance and its contents remain in good condition. If you don't want to throw away used computer parts, you can give them new life, using to create interesting things.
What can be made from a computer mouse: ideas
External and internal parts from the old device will be useful for creating the following original things.
Robot
An unnecessary ball mouse will become a light-sensitive robot. To do this, the parts are disassembled, and the switches and infrared emitter are left for operation. The body must be freed from unnecessary parts and protrusions, and wheels must be attached, wrapped in three layers of rubber tape. Next you will need a relay, which needs to be installed inside the case, connected necessary contacts and solder the wiring. To operate, the robot will also need a small microcircuit; it must be placed inside the case. It remains to make two holes for the eyes and one for LED lamp in the front and one toggle switch hole in the back. Contacts are attached to the right and left motors, eyes and battery are connected. The robot is turned on using a toggle switch.

Flashlight
By inserting an LED inside the housing, you can get a small flashlight. Using the same method, you can make a small table stand or lamp. A stand is attached where the wire is connected, and a lighting lamp can be installed in the place of the ball.
Important! Do not use incandescent lamps as lighting. When they heat up, they can damage the plastic from which the mouse body is made.

Tachometer
Using a board from old mouse you get a tachometer. Transistors and an LED board element will come in handy. A resistor is soldered into the free hole of the controller, and a contact from the phototransistor is connected to the board connector. All that remains is to connect the tachometer through the connector to the computer. The resulting device counts rotation pulses per second and displays the data on the monitor.

Winder
A hole is drilled in the upper part of the body into which an adapter with a convenient attachment is placed. Such a winder will be mechanical and will rotate due to the movement of the adapter.

What can be made from many computer mice
If you have a lot of computer mice, you can use them by making:
Columns
By disassembling the plastic case and placing a small speaker there, you can get audio speakers. To do this, you need to unscrew the screw with a screwdriver and divide the device into two parts. Place a custom-sized speaker inside. The wiring must be cleaned, the contacts and their compatibility with the color of the wire must be checked with a tester. Then use hot glue to firmly secure the speaker disk inside and connect both parts of the housing. Such portable speaker Suitable for phones, tablets, players and even computers.
Advice! If you make a hole in the front of the mouse body, the sound will be more powerful.

Robot RoboCop
This idea will work if you have a lot of broken computer mice at home. From them you can assemble the body and limbs of a complex robot. The role of such a craft can only be decorative, but if you equip the robot with an electrical mechanism, you can get an interesting toy that can move and emit light.
"Everything is temporary. Love, art, planet Earth, you, me. Especially me." (99 Francs)
Nothing in this world lasts forever, and the life of gadgets is sometimes very fleeting. But if you love retro style and are frugal and resourceful by nature, then you can give them a second chance by transforming them into something useful and retro looking.
5. Turn an old mouse into a wireless one
Old mice aren't as comfortable or ergonomic as newer models, but they give you that comfortable feeling, like an old shirt that's so old that you sneak it around the house on the weekends when no one is looking, simply because you've had it for a long time and you like it. you are used to it :) If you are still using an old wired mouse, or have kept it as an old battle friend, then now is the time to convert it into a wireless Bluetooth mouse, simply replacing the insides of the old mouse with the insides of a new one.

Let’s say right away that this is a decision dictated solely by a feeling of nostalgia rather than by practical considerations. If old mouse is too inconvenient for weekly use, you can use it to make a camera shutter.

4. Turn an analog TV into an information terminal

Most likely, you have already updated your entire fleet of televisions a long time ago, and the old CRT monitors are gathering dust, at best, somewhere in the country. You can give an old TV a new life by turning it into a YBOX (a homemade information screen that shows the weather, for example).
An alternative use is a retro photo frame, which can be placed in the living room. To turn a TV into a photo frame, you need to remove the insides of the TV and replace them with the old sockets and power cord from the lamp, screw in a low power CFL lamp, insert a printed image on the screen, close it and turn on the “TV”.
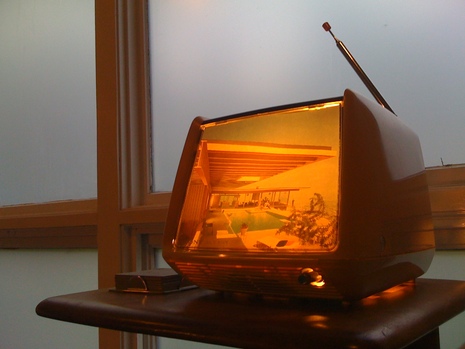
Now you have a fun retro frame.
If you don't want to waste electricity, recycle your old monitor into a trash bin.

3. Make an aquarium out of an old TV or computer
A project from the “incredible but true” series marked “dangerous.” Do it at your own peril and risk. If you have an old TV, computer or other unnecessary equipment with a lot of space inside, you can turn it into an aquarium.


If you want to use Floppy drives for their intended purpose, you can put USB in them.

1. Making a VoIP phone from a rotary phone
If it is morally difficult for you to say goodbye to your old rotary phone, you can turn it into a fun computer headset for use with Google Voice, Skype, or any other VoIP solution.

If you have several unnecessary cordless phones(not really old ones), then you can make good walkie-talkie radios out of them.
I hope this collection of ideas for transforming old gadgets has inspired you. Following the links you will see visual guides on how to do this or that thing, on English language. All guides have good visualizations of each of the conversion stages.