Mac os forgot account password. What to do if you forgot your Mac OS X login password or how to recover your account password. Recovering via Apple ID
Every time you create a new user in Mac OS, be it on new MacBook, iMac, Mac mini, or on a computer with a newly restored OS, the system requires you to set a password account. A password is required to log in to Mac computer, making changes to the system and installing software. In this way, the system protects you from the actions of others by requiring you to constantly enter a password to perform important operations.
But what to do if something irreparable happens - you forgot your password because you logged in without entering a password (you can enable this feature in System Preferences) or you purchased a new or used Mac with an already activated system and a created user.
There are several ways to reset your password on Mac OS:
Reset your account password using your Apple ID
This method is suitable for those Mac users who checked the box when creating an account reset your password using your Apple ID.

Step 1 On the sign-in screen, enter your password until you see the option to reset your password using your Apple ID message.
Step 2 Click the button next to the Apple ID message

Step 3 Enter your Apple ID, password and click Reset Password

Step 4 After this a keychain message will appear, click OK to continue
Step 5 Specify New Password and click Reset password

Step 6 You will see a dialog box with a message that the system was unable to unlock your login keychain. This is quite logical, since the keychain uses Old Password. You must click the New keychain button, and then load into the desktop

Resetting a user's password using a different account
If you have multiple administrative accounts on your Mac and you know their username and password, then use this to reset your password. If you are the only user, then you will need to proceed with resetting your password later
Step 1 Sign in using the username and password of an account you know
Step 2 Open the program " System Settings" and select a section Users and groups

Step 3 Click the button in the lower left corner, enter the administrator password and click on the Unprotect button


Step 4 Now select the user for whom you need to reset the password and click on the Reset Password... button.

Step 5 Enter a new password and click Change Password

Step 6 Log out of the current user (log out of your account) and log in to yours using your new password
Step 1 Insert the Mac OS disk or flash drive into your computer and reboot
Step 2 After you hear the boot sound operating system press on your keyboard:
- if you are using a disk, use the C key
- if you are using a flash drive, press the ⌥Option (Alt) key and select it among the drives
Step 3 The Mac OS X installer will appear in front of you. Select the required language (for example, Russian) and click Continue
Step 4 If you are using OS X Snow Leopard (10.6) and older, then in the menu bar select Utilities → Reset Password

If OS X Lion (10.7) and later (Mountain Lion, Mavericks, Yosemite, El Capitan, Siera), then Utilities → Terminal
Type resetpassword and press Enter
Step 5 You will see a password reset window. Select the drive where you installed Mac system OS and the user for whom you need to reset the password, only Not root user! Enter a new password and click Save

Step 6 Restart your Mac and sign in with your new password
Resetting your account password in Recovery Mode
If you don't have any installation disk, nor a flash drive to make it bootable, then you can boot the Mac into Recovery Mode and use the Terminal, as in the previous method.
Step 1 Turn on or restart your computer by holding down the ⌥Option (Alt) key until the drives window appears
Step 2 Select the drive named "Recovery" or "Recovery-..." to boot into the recovery environment

Step 3 When “Recovery Mode” boots up, select Utilities → Terminal from the menu bar

In the program, enter the resetpassword command and press Enter
Step 5 In the window that appears, select the drive with installed system and the user for whom you need to reset the password, only not root user. Enter a new password and click Save
Step 6 Restart your Mac, click → Restart
You can now log into your account using the password you just changed.
Use Single User Mode to reset your account password
This method is the most labor-intensive, since it is not graphical, but text-based, where you need to use special console commands.
Step 1 Restart your Mac and once you hear audio greeting hold down the combination ⌘Cmd + S on your keyboard to boot the system into single-user mode. Lines of code will run and when you see the line on the screen localhost:/root#– this will mean that the computer has booted
Step 2 If you have OS X Snow Leopard (10.6) and lower installed, then enter the following commands and press Enter after each:
fsck-fy
mount -uw /
launchctl load /System/Library/LaunchDaemons/com.apple.DirectoryServices.plist
dscl. -passwd /Users/
reboot
If OS X Lion (10.7) and higher (Mountain Lion, Mavericks, Yosemite, El Capitan, Siera), then:
fsck-fy
mount -uw /
launchctl load /System/Library/LaunchDaemons/com.apple.opendirectoryd.plist
dscl. -passwd /Users/ user_name user_password
reboot
Replace Username to your user, and user_password for a new password. If you forgot not only your password, but also your username, enter ls /Users in the console to display a list of users on your Mac.
If you see the following error:
Launchctl: Couldn’t stat(“/System/Library/LaunchDaemons/com.apple.DirectoryServicesLocal.plist”): No such file or directory nothing found to load don’t worry the password will be changed anyway
Step 3 After loading Mac OS, log into your account with a new password
“Method of deception” and creating a new user with administrator rights
If the methods described above did not help you and there is only one user on your Mac, the last thing you can do is create a new administrator account and use it to reset the password. All actions must be performed in Single User Mode.
A little about the method, this trick allows you to delete a file with information about the first launch of macOS (OS X) from the system. After which you will have to go through all the steps of setting up and registering a new user again, but there is no need to worry, both the old account and all data will remain intact
Step 1 To boot the system into single-user mode, restart your Mac and press the keyboard shortcut ⌘Cmd + S at startup
Step 2 Once you have entered a blank line localhost:/root# Type the following commands and press Enter to execute each one:
fsck-fy
mount -uw /
rm /var/db/.AppleSetupDone
shutdown -h now
Step 3 After the last command, your Mac will turn off, turn it on and go through the steps of setting up and creating a new user (country, keyboard layout, Internet connection, name and password)
Now another account has appeared on your Mac and you can proceed (starting with Step 2 of the instructions:)
Creating a new keychain
After you reset your password and sign in to your account with the new password, you may receive a message that the system was unable to unlock your login keychain. This makes sense, since the keychain uses the old password. You must click the New keychain button
If such a message does not appear, or other messages appear asking for the old password, you need to manually reset the keychain.
Step 1 Open the Keychain Access program, it is located in the Programs → Utilities folder
Step 2 Go to the program settings by pressing ⌘Cmd + , and click on the Restore default link button. , then enter a new password and click OK to have the program create an empty login keychain - no password

If the button Restore default link. does not appear, close the settings window and select the “Login” keychain on the left side of the program window, then press the Delete key and click Delete links
Step 3 Now log out and log back into your account
Now, when you forget your password, you can easily reset it.
Many others useful tips You will find it on our social media pages.
Despite the ambiguous title, the article will not be about hacking accounts in Mac OS X (you can read about this on specialized Internet resources if you wish). On the contrary, today we will consider a situation where, due to prevailing circumstances, the user forgets the password to log into the system and it is not possible to recover it.
RESET VIA APPLE ID
To begin with, we note that in similar situation Apple now offers reset your password using your Apple ID. This is an exclusive feature of OS X Lion, and you can enable it in two ways - either during initial setup system, or in the “Accounts” console in System Settings.

After several unsuccessful attempts to enter your password, you will see a pop-up window on the login screen asking you to enter your Apple ID. The system will honestly warn you that it will reset your password, but the Keychain, where all the passwords you previously entered are stored in encrypted form, will remain locked until you remember the old password. Since the old Keychain can no longer be used, the system will create a new one.
RESETING YOUR PASSWORD IN SINGLE USER MODE
If you don’t have the installation DVD at hand and you can’t remember the password, the following password reset method may help.
After turning on the Mac, while the welcome screen is displayed, press and hold the key combination Cmd+S until the computer boots into single-user mode and we see the command line. In fact, working in the command line is not much different from working in the Terminal, and therefore for users who have already had experience with this application, the proposed commands will not seem unfamiliar. Do not forget that after each entered command you should press the key RETURN.
mount -uw /
launchctl load /System/Library/LaunchDaemons/com.apple.DirectoryServices.plist
The following command displays a list of all users on this Mac:
ls /Users
Now the most interesting and important thing - we enter the command in which username replace it with the username for which the password should be changed, and instead password indicate the desired new password.
dscl. -passwd /Users/username password
The final step is to restart the computer using the following command:
reboot
METHOD NUMBER THREE
This is an even funnier way to fool Mac OS X and force the creation of a new user on the system, bypassing all passwords.
As in the previous method, hold down the keys Cmd+S, boot into single-user mode. Then enter the following two commands, not forgetting to click on after entering each command RETURN:
mount -uw /
rm /var/db/.AppleSetupDone
To restart the Mac, we use a command slightly different from the one we used in the previous version:
shutdown -h now
As a result of the actions we took, we made the system think that it had never been launched before. As a result, after a reboot we will have to go through all the steps of setting up and registering the system again. The information on the hard drive will remain safe and sound in any case, so feel free to go through all the setup steps, not forgetting to refuse data migration at the very end.
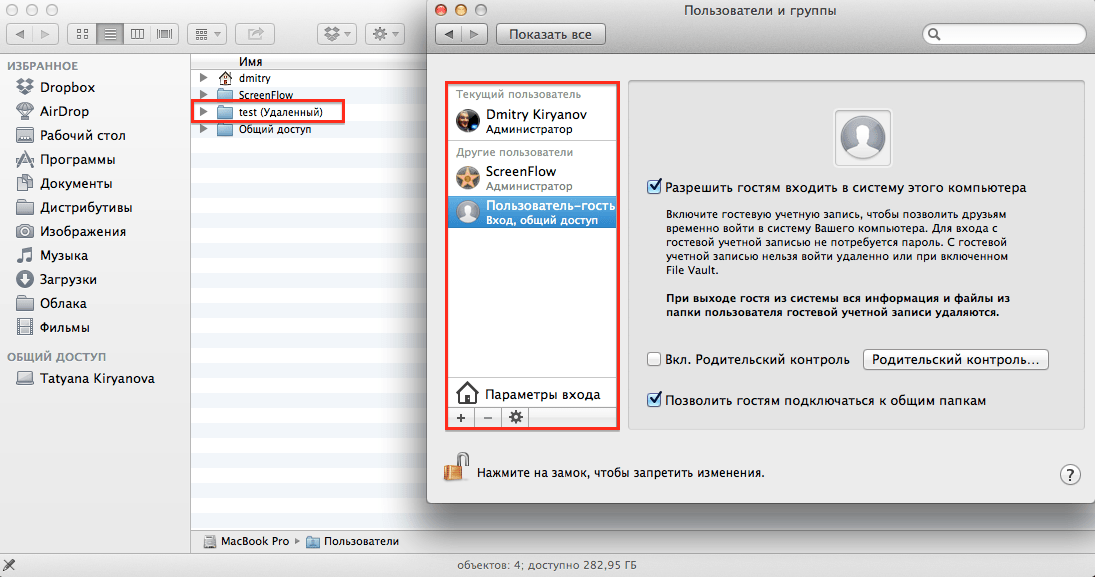
After the reboot, log into the system under a new account and, opening Settings panel, go to the section Accounts. In the screenshot we see the name in the list of users Master(the old account for which we want to reset the password) and Anjul (new account administrator, which we created in single-user mode).

In order to unlock the list and be able to make changes, click on the lock and enter the account password in a new window Anjul, under which we logged into the system.

After access is obtained, click on the old account Master and press Reset the password. In the next window, we indicate a new password for this account and, if desired, a hint so that you can remember it if it is forgotten again.

Now you can restart your Mac and log in using your old account Master, and delete the new one, which has become unnecessary.
That's all. We hope that our tips will help you regain access to your account. However, we wish that you don’t need the tips described above after all :)
It is important to understand that anyone with physical access to your computer (be it Mac, Windows or Linux) will sooner or later be able to find a way to log into it. If a person is sitting right in front of your computer, then there is no such thing as absolute security.
Therefore, if you really care about protecting your files, then you should consider using the FileVault utility to encrypt them.
Resetting your password using Lion Recovery
If you bought yourself a completely new mac With the Lion operating system pre-installed, you have a recovery partition on your hard drive that offers you access to a number of different tools.
Here's how to use them to reset your Mac password:
- Turn off your Mac and then turn it on by holding down the Command and R keys until the Lion recovery screen appears;
- Select Russian language in the first window;
- From the top menu, select Utilities > Terminal;
- In a terminal window, enter resetpassword and press Enter;
- In the password reset utility, select your hard drive, select your account, and enter a new password.
Resetting Lion passwords in single-user mode
Mac OS X Lion users can also use the following method to reset their password.
Turn off your Mac and then turn it on by holding down the Command and S keys until a black screen with white text appears. This mode is known as single-user
After checking the disk and returning to the command prompt, type mount -uw / and press Enter.
Now dial ls /Users and press Enter. You'll see a list of everyone on your computer, which is useful if you don't know or remember the name.
Dial dscl. passwd /Users/username password by replacing the username parameter with one of the names from the list presented to you, and the password parameter with a new password of your choice.
Press Enter. Most likely, you will see a message about the file or directory not being found - you can simply ignore it.
All that remains is to type reboot and press Enter.
All Macs are initially configured in such a way that there is at least one administrator user in the OS. But it happens that when there are global system changes (installing updates, changing access rights) or computer configuration, a user with administrative privileges “disappears” from Mac OS. That is, the account, for the most part, remains in the system (without any changes in the file hierarchy), but it is deprived of the ability to administer. This problem is not at all common, but in our practice it happens with enviable regularity.
We will consider two options for possible restoration of a user with administrative privileges. The first is used by the author of the English-language article, Topher Kessler, the second is used by us. Until now. The third part of this article will be a list of tips on what to do if enabling the administration feature does not help. So,
Method one. Usage Single-user mode(Single User Mode) and System Setup Assistant
Initially, the new Mac ships without created user. When you turn on your computer for the first time, it automatically starts System Setup Assistant, working with superuser (root) access rights. This program offers create administrator and configure the system. After its completion, Mac OS marks the successful setup of the system and launches it again System Setup Assistant(present in Mac OS always and stored in the root folder System -> Libraries -> CoreServices) becomes impossible. The trick to the method proposed by Kessler is that you need to remove this mark and again run the setup program, create a new administrator and use it to change the access rights of previously created users.
The hidden mark indicating successful system setup is stored at /var/db and is named “.AppleSetupDone”. At everyone When the computer starts, the operating system checks for its presence and if it does not find this file, it launches the setup assistant automatically. Let's get started.
- We start the computer in Single-user mode(Single User Mode)
To do this, restart the computer and, when turning it on, press and hold down two keys: ⌘(Command) + S. The usual graphical shell will not loaded, don't be alarmed, you'll be taken to the interface command line with superuser (root) access rights. This is a very powerful mode that gives complete unrestricted access to all aspects of the system using terminal commands; it must be used with understanding and a certain amount of caution. With the right skill, many of your Mac's problems can be resolved with its help. - Enable write access in the file system
By default when loading into Single-user mode you get read-only access to information from hard drive, without the possibility of changing it. This doesn’t suit us, so we enter the command:
mount -uw / - Removing the hidden mark about successfully completed system setup
We enter a single command line to delete the file we need, exactly as it is presented below. Be careful, the only space present in the code is after the “rm” command, there should be no others.
rm /var/db/.AppleSetupDone - Reboot the computer
All necessary actions required by us to be carried out in Single-user mode produced. Reboot the computer by entering the command:
reboot
All commands have already been entered
The result of all operations performed will be the launch System Setup Assistant when you turn on the computer. Following his prompts, we create a new administrator, different from existing users (that is, the name of the user being created must be unique and different from the names of users already present in the system). We load into it and work in it.

This administrator user is temporary and will be deleted in the future; we only need it to enable administration for other accounts.
Now opening -> System Preferences -> everyone accounts present on your Mac. All you need to do is find the required user and in its properties check the “Allow this user to administer the computer” checkbox. Which is exactly what we needed from the start!

The required checkbox is highlighted in red
Method two. Enabling the super-user root and working in it
This method is more transparent for fans GUI therefore, many will feel more comfortable using it. The logic of the argument is similar to that presented above: to enable the administrator on a Mac (provided there is no at least one administrative account), you need to work with super-user rights, root. But this time we won't run System Setup Assistant, but elementary let's turn it on this account.
The super user root is always present on a Mac, but initially the ability to log into this account is limited. To enable it use Password reset utility.
- Start the computer from the recovery partition
To do this, restart the computer and, when turning it on, press and hold down two keys: ⌘ (Command) + R. After the recovery system has loaded, the desktop will appear with the operating system menu bar and the program window Mac OS X Utilities.
- Start the computer from the recovery partition

- Let's launch Password reset utility
From the menu bar, select Utilities -> Terminal. In the window that opens terminal enter the command exactly as shown below:
- Let's launch Password reset utility


Exactly as in the instructions, enter the “resetpassword” command
- Enable super user root
In the opened Password reset utility select the root user and set a password for the account. This must be done; the root user cannot be without a password. At Apple, when creating images of diagnostic systems, the default root password is configured, which is equivalent to its short name - “root”. Click the “Save” button, a message indicating the success of the procedure will appear.
- Enable super user root

By the way, using the recovery partition and Password reset utilities You can reset the password not only for the root user, but also for any other user represented in the system. If security is a major concern, Apple recommends enabling FileVault 2 data encryption, which makes this operation impossible.
Close all windows, including the window Mac OS X utilities. In the dialog box we will be asked to “Restart the computer”, to which we helpfully agree. When the system starts, the account login window will display new entry, "Another". This is what you need. Select it, enter “root” in the username, “root” in the password field (if in the third step of these instructions you entered your own password, enter it). Now by opening -> System Preferences -> Users and Groups, you can manage everyone accounts present on your Mac. All you need to do is find the required user and in its properties check the “Allow this user to administer the computer” checkbox.
But that's not all. We solved the original problem, but at the same time made the operating system less secure by enabling the root super-user. It should be turned off.
- Disable root superuser
While in the same “Users and Groups” settings System Settings Click on the “Login Options” tab and on the right side of the window we find the “Connect” button opposite the entry “ Network server accounts." Click it and then, in the window that opens, click the “Open Directory Service” button. Starts separate program Directory service, in the menu bar of which select Edit -> Disable root user.
Part three. When enabling administrator is not enough
Yes, that happens sometimes too. You check the “Allow this user to administer this computer” checkbox. System settings, but this does not lead to the desired effect. In this case, there is only one way out - deleting the user.
Very important. Make sure you have backup copy everyone the data you need (if you make a small mistake in further steps, you can part with all the information)!
- We delete the user while saving all data and settings
Open -> System settings -> Users and groups, select the “unwanted” user and delete him by clicking on the minus “-” button. The system will ask you what to do with the user's home folder. Important! Select “Do not change user folder”.
- We delete the user while saving all data and settings


- Checking the safety of the user folder
Open the "Users" folder on your Mac and make sure that it contains the folder of the user you deleted one step earlier (the "Users" folder is stored in the root of the hard drive, for quick access to it in the menu bar Finder select Go -> Computer and open your HDD, named "Macintosh HD" by default). Remember the name of this folder, it is equivalent to the name of the “account” (in the English interface the more understandable term “short name” is used) remote user. IN latest versions The operating system adds the “Remote” label to the name of the remote user. The folder name can be edited and this label can be erased.
- Checking the safety of the user folder
The same mark
- Creating a new user
In the same “Users and Groups” settings of the program System Settings Create a new user by clicking on the plus “+” button. It is very important at the creation stage to indicate the same “account” name (short name) that the user had previously, we remembered it in the paragraph earlier, it is the same as the folder of the remote user. And of course, change the type of new account you are creating from “Standard” to “Administrator”. If everything is done correctly, the operating system will report that it has detected another user folder and will offer to use it for the new administrator. Agree, this is what we started this whole thing about. A new account with administrative privileges will be created, saving all your data and settings.
- Creating a new user
Unlike the operating system from Microsoft, to activate some functions, access certain settings sections and install certain applications, owners of Apple computers need to enter an administrator password. The same mechanism operates when turning on or unlocking a Mac.

Thus, the Cupertino team significantly increases the security of their desktop platform from a variety of threats. For example, a password that must be entered every time you boot OS X helps protect data stored in the memory of Apple computers.
However, if users only use the computer at home and do not take it with them on trips or do not go to work with it, the password can be disabled. This way, you can somewhat simplify the process of turning on and unlocking your Mac. It's quite simple to do this:
- Open System Preferences.

- Go to the Users and Groups section.

- In the lower left part of the window that opens, select Sign-in options.
To make changes in this section, you need to click on the lock icon and enter the password for the administrator account.

- In the Automatic login section, select the user account name.
It is worth noting that in some cases the function that allows you to disable entering a password when turning on or unlocking an Apple computer may not be available. This is most likely due to one of two main reasons:
- a function called FileVault is active, which is responsible for disk encryption. It helps improve the security of data stored on computers and also makes it more difficult to reset your Mac password.
- The password you use to sign in is the same as the password you use in your linked iCloud account.
Let us note once again that disabling the password for logging into the system, although it makes life somewhat easier for ordinary Mac users, it also significantly reduces the security of the Apple computer.